
Description
This document will show you how to configure Apache httpd to display unique stats on http://stats.example.com from http://example.com for as many domains as you have configured, simply repeat this process as many times as you like.
Purpose & Scope
For the purposes of this document we’ll assume:
- You are the owner of your domain.
- You are the owner of your server or hosting account.
- You are running an official copy of CentOS, RHEL or Fedora. (Can also be installed on other Linux distros, Mac OSX and Windows)
- You have SELinux enabled.
The purpose of this particular setup is to give a stats link to your customers or for your own sites that will show the actual stats as recorded by the Apache httpd log files so you or your customers can contrast and compare with Google Analytics or other stats.


Requirements
Explanation of requirements.
- Administrative control over your domain and DNS entries.
- Administrative or root access to your system.
- Apache httpd configured properly with the domain you want to track with AWStats.
Doing the Work
In this document we will assume: you are root, you own example.com and have administrative access to create the subdomain stats.example.com.
- Installing the EPEL software repository, AWStats and optional components for Geo tracking:
- After successful install of the above software we will make a copy of the default AWStats config that we can use over and over:
- Next we create the directories for the new subdomain stats.example.com. For security purposes the default Apache httpd documentRoot in Centos is
/var/www/ - Next we copy the AWStats program files to our newly created /var/www/example.com/stats directory:
- Next, edit /etc/httpd/conf/httpd.conf
- Next, let’s alter the Apache httpd vhosts.conf file and add an entry for our new subdomain:
- See the PHP-FPM document for adding that to the configuration
- Now let’s edit the
awstats.stats.example.com.confwe created above: - LogFile=”/var/log/httpd/example.com_access_log”
- SiteDomain=”example.com”
- HostAliases=”example.com”
- DirData=”/var/www/example.com/stats”
- DirIcons=”/icon”
- LoadPlugin=”graphgooglechartapi”
- LoadPlugin=”geoip GEOIP_STANDARD /usr/share/GeoIP/GeoIP.dat”
- LoadPlugin=”geoip_city_maxmind GEOIP_STANDARD /usr/share/GeoIP/GeoLiteCity.dat”
- Next let’s restart Apache httpd so our changes take effect:
- Next we’ll call the AWStats perl script to manually update our stats right now:
- Next, to update our stats automatically every hour via cron we do the following:
- Finally, mark the file as executable so the system can run it
- We can also use htpasswd within our VirtualHost Directory block or htaccess file to require usernames and passwords for basic access to the directory from prying eyes.
- Create a secure area to store password files, outside the DocumentRoot
- Create a new user (joe) and password for that user. We’ll use the -c (create new) and -s (use sha instead of md5 passwords). The -c flag only needs to be given the first time, when there is no existing password file.
- Let’s Check to see the password was actually added as expected:
- Edit the VirtualHost and add the code below
- Install mod_auth_mysql
- Create MariaDB container
- Add Apache httpd Auth Directives
- Restart the webserver
Click the EPEL link for more verbose instructions or give this command:
C6: su -c "https://dl.fedoraproject.org/pub/epel/epel-release-latest-6.noarch.rpm"
C7: su -c "https://dl.fedoraproject.org/pub/epel/epel-release-latest-7.noarch.rpm"
Then issue this command:
yum --enablerepo=epel install awstats GeoIP-data perl-Geo-IP
As of Centos 6.7 there is no longer a maintained perl-Geo-IP RPM package for Centos 6 from EPEL. This is required to use the Maxmind free or paid geo databases. The 64bit and src packages are provided so you can either install or rebuild your own.
Download here:
perl-Geo-IP-1.38-6.el6.x86_64
perl-Geo-IP-1.38-6.el6.src
Since there is no Centos package for the GeoLiteCity.dat you can get the single file from MaxMind as well as updated GeoIP.dat files here:
http://www.maxmind.com/app/geolitecountry
http://geolite.maxmind.com/download/geoip/database/GeoLiteCountry/GeoIP.dat.gz
http://www.maxmind.com/app/geolitecity
http://geolite.maxmind.com/download/geoip/database/GeoLiteCity.dat.gz
If you choose to use only the MaxMind files directly, you can put them in /var/www/GeoIP as follows:
sudo mkdir /var/www/GeoIP; cd /var/www/GeoIP
sudo wget http://geolite.maxmind.com/download/geoip/database/GeoLiteCountry/GeoIP.dat.gz
sudo wget http://geolite.maxmind.com/download/geoip/database/GeoLiteCity.dat.gz
sudo gunzip GeoIP.dat.gz GeoLiteCity.dat.gz
Copy default conf so we always have a clean starting point if something goes wrong.
cp /etc/awstats/awstats.model.conf /etc/awstats/awstats.model.conf.orig
Make another copy for our example site.
cp /etc/awstats/awstats.model.conf.orig /etc/awstats/awstats.stats.example.com.conf
Our DocumentRoot for example.com is in /var/www/example.com/main. With this structure, anything associated with example.com is all in one place but completely separate, regardless of how many subdomains we have.
Make a new directory to hold the DocumentRoot for the stats subdomain:
mkdir -p /var/www/example.com/stats
cd /usr/share/awstats/wwwroot/
sudo cp -R * /var/www/example.com/stats/
cd /var/www/example.com/stats/cgi-bin/
sudo cp * ../
vi /etc/httpd/conf/httpd.conf
Change this line: #AddHandler cgi-script .cgi
To this: AddHandler cgi-script .cgi .pl
Add this information in /etc/httpd.conf.d/vhosts.conf
create this file if it does not exist
You should already have a domain configured that you’d like to track the stats of like this:
1 2 3 4 5 6 7 8 9 10 11 12 13 14 15 16 17 18 19 20 21 22 23 24 25 26 27 28 29 30 31 32 33 34 35 36 37 38 39 40 41 42 43 44 45 46 47 48 | ################### ### Example.com ### ################### <VirtualHost *:80> ServerAdmin admin@example.com ServerName example.com ServerAlias www.example.com DocumentRoot /var/www/example.com/main ScriptAlias /cgi-bin/ /var/www/example.com/cgi-bin/ CustomLog logs/example.com_access_log combined ErrorLog logs/example.com_error_log </VirtualHost> We'll be adding this subdomain to track the above domains stats: ########################### ### Example.com AWStats ### ########################### <VirtualHost *:80> ServerAdmin root@localhost ServerName stats.example.com DocumentRoot /var/www/example.com/stats/ ScriptAlias /cgi-bin/ /var/www/example.com/stats/cgi-bin/ CustomLog logs/stats.example.com_access_log combined ErrorLog logs/stats.example.com_error_log ## AWStats ## Alias /classes "/var/www/example.com/stats/classes/" Alias /css "/var/www/example.com/stats/css/" Alias /icon "/var/www/example.com/stats/icon/" ScriptAlias /awstats/ "/var/www/example.com/stats/cgi-bin/" ## End AWStats ## <Directory /var/www/example.com/stats/> Options +ExecCGI +Indexes DirectoryIndex awstats.pl AllowOverride All Order allow,deny Allow from all ## Access Authorisation ## AuthName "Restricted Area" AuthType Basic AuthBasicProvider file AuthUserFile /var/www/example.com/secure/.htpasswdstats AuthGroupFile /dev/null require valid-user </Directory> </VirtualHost> |
vi /etc/awstats/awstats.stats.example.com.conf
We will be editing the following lines:
(Optional: using the MaxMind direct download method)
(Optional: using the MaxMind direct download method)
note: Make sure each of the above lines is uncommented and correctly configured for your setup.
note: The LogFile directive in the AWStats config must be the same as the httpd VirtualHost CustomLog directive for the site we actually want the stats from (example.com).
C6: service httpd restart
C7: systemctl restart httpd.service
perl /var/www/example.com/stats/cgi-bin/awstats.pl -config=stats.example.com -update
vi /etc/cron.hourly/awstats_example.com
Add this line, save and exit:
1 | perl /var/www/example.com/stats/cgi-bin/awstats.pl -config=stats.example.com -update > /dev/null 2>&1 |
chmod +x /etc/cron.hourly/awstats_example.com
C6: service crond restart
C7: systemctl restart crond.service
Do not confuse this with security of any kind, this is easily bypassed, for better security, use the mod_auth_mysql method below instead and load the domain over ssl
Method #1 – htaccess, htpasswd
We’ll be doing this work as root in the directory: /var/www/example.com/secure/
We’ll store our password file outside of the DocumentRoot so no one can download or directly access it.
mkdir /var/www/secure
htpasswd -c -s .htpasswds Joe
1 2 3 | New password: Re-type new password: Adding password for user Joe |
vi .htpasswd_stats
1 | Joe:{SHA}9Q+DCACuf4OZs8b0E8eR5j1aIVU= |
vi /etc/httpd/conf.d/vhosts.conf
Add this to the VirtualHost entry for stats.example.com:
1 2 3 4 5 6 7 8 | <Directory "/var/www/example.com/stats/"> AuthName "Restricted Area" AuthType Basic AuthBasicProvider file AuthUserFile /var/www/example.com/secure/.htpasswd_stats AuthGroupFile /dev/null require valid-user </Directory> |
Method #2 mod_auth_mysql
yum install mod_auth_mysql
$ mysql -u root -ppassword
1 2 3 4 5 | MariaDB [(none)]> create database http_auth; MariaDB [(none)]> grant all privileges on http_auth.* TO 'http_auth_admin'@'localhost' identified by 'strong_password'; MariaDB [(none)]> use http_auth; MariaDB [(none)]> create table mysql_auth ( user_name char(30) NOT NULL,user_passwd char(60) NOT NULL,user_group char(25),primary key (user_name) ); MariaDB [(none)]> insert into mysql_auth values('Joe','strong_password','employees'); |
1 2 3 4 5 6 7 8 9 10 11 12 | <Directory /var/www/example.com/stats> AuthType Basic AuthName "Authorised users only." AuthMySQLHost localhost AuthMySQLUser http_auth_admin AuthMySQLPassword db_password AuthMySQLDB http_auth AuthMysqlUserTable mysql_auth AuthMySQLPwEncryption none AuthMySQLEnable on require valid-user </Directory> |
Examples:
require valid-user : Allow all users if authentication (password) is correct.
require user greg phil bob : Allow only greg phil bob to login.
require group accounting : Allow only users in group “accounting” to authenticate.
List of Apache httpd Directives for MySQL auth
| Directive | Description |
|---|---|
| AuthMySQLEnable On | If ‘Off’, MySQL authentication will pass on the authentication job to the other authentication modules i.e password files. |
| AuthMySQLHost host_name | Name of MySQL Database hosr. i.e. ‘localhost’ |
| AuthMySQLPort TCP_Port_number | Port number of MySQL Database. Default: 3306 |
| AuthMySQLDB database_name | Name of MySQL Database. |
| AuthMySQLUser user_id | MySQL Database login id. |
| AuthMySQLPassword user_password | MySQL Database login password. Plain text. |
| AuthMySQLUserTable user_table_name | Name of MySQL Databse table in the database which holds the user name and passwords. |
| AuthMySQLGroupTable group_table_name | Databse table holding group info. |
| AuthMySQLNameField user_field_name | If not using default field name ‘user_name’, then specify. Not case sensitive id CHAR or VARCHAR. |
| AuthMySQLPasswordFieldpassword_field_name | If not using default field name ‘user_passwd’, then specify. Passwords are case sensitive. |
| AuthMySQLGroupField group_field_name | If not using default field name ‘groups’, then specify. |
| AuthMySQLNoPasswd Off | Off: Passwords can be null (”). On: password must be specified. |
| AuthMySQLPwEncryption none | Options: none, crypt, scrambled (MySQL password encryption), md5, aes, sha. If you are going to use plain-text passwords for mysql authentication, you must include this directive with the argument “none”. |
| AuthMySQLSaltField salt_string mysql_column_name | Salt field to be used for crypt and aes. |
| AuthMySQLAuthoritative on | Authenticate using other authentication modules after the user is successfully authenticated by the MySQL auth module. Default on: request is not passed on. |
| AuthMySQLKeepAlive Off | Off: Close the MySQL link after each authentication request. |
C6: service httpd restart
C7: systemctl restart httpd.service
Now, try hitting your site at: http://stats.example.com You should be prompted for a username and password for your user.
If you run into errors, try double checking the steps or join #centos or #httpd on Freenode for further assistance.
Troubleshooting & Testing
Explanation troubleshooting basics and expectations.
- Testing your configuration:
- If this does not work for you, please go through the document more slowly and double check every setting as well as your Apache httpd error logs:
- If you do not see the GeoIP data, but the rest of AWStats works, check the SELinux file contexts for the GeoIP files:
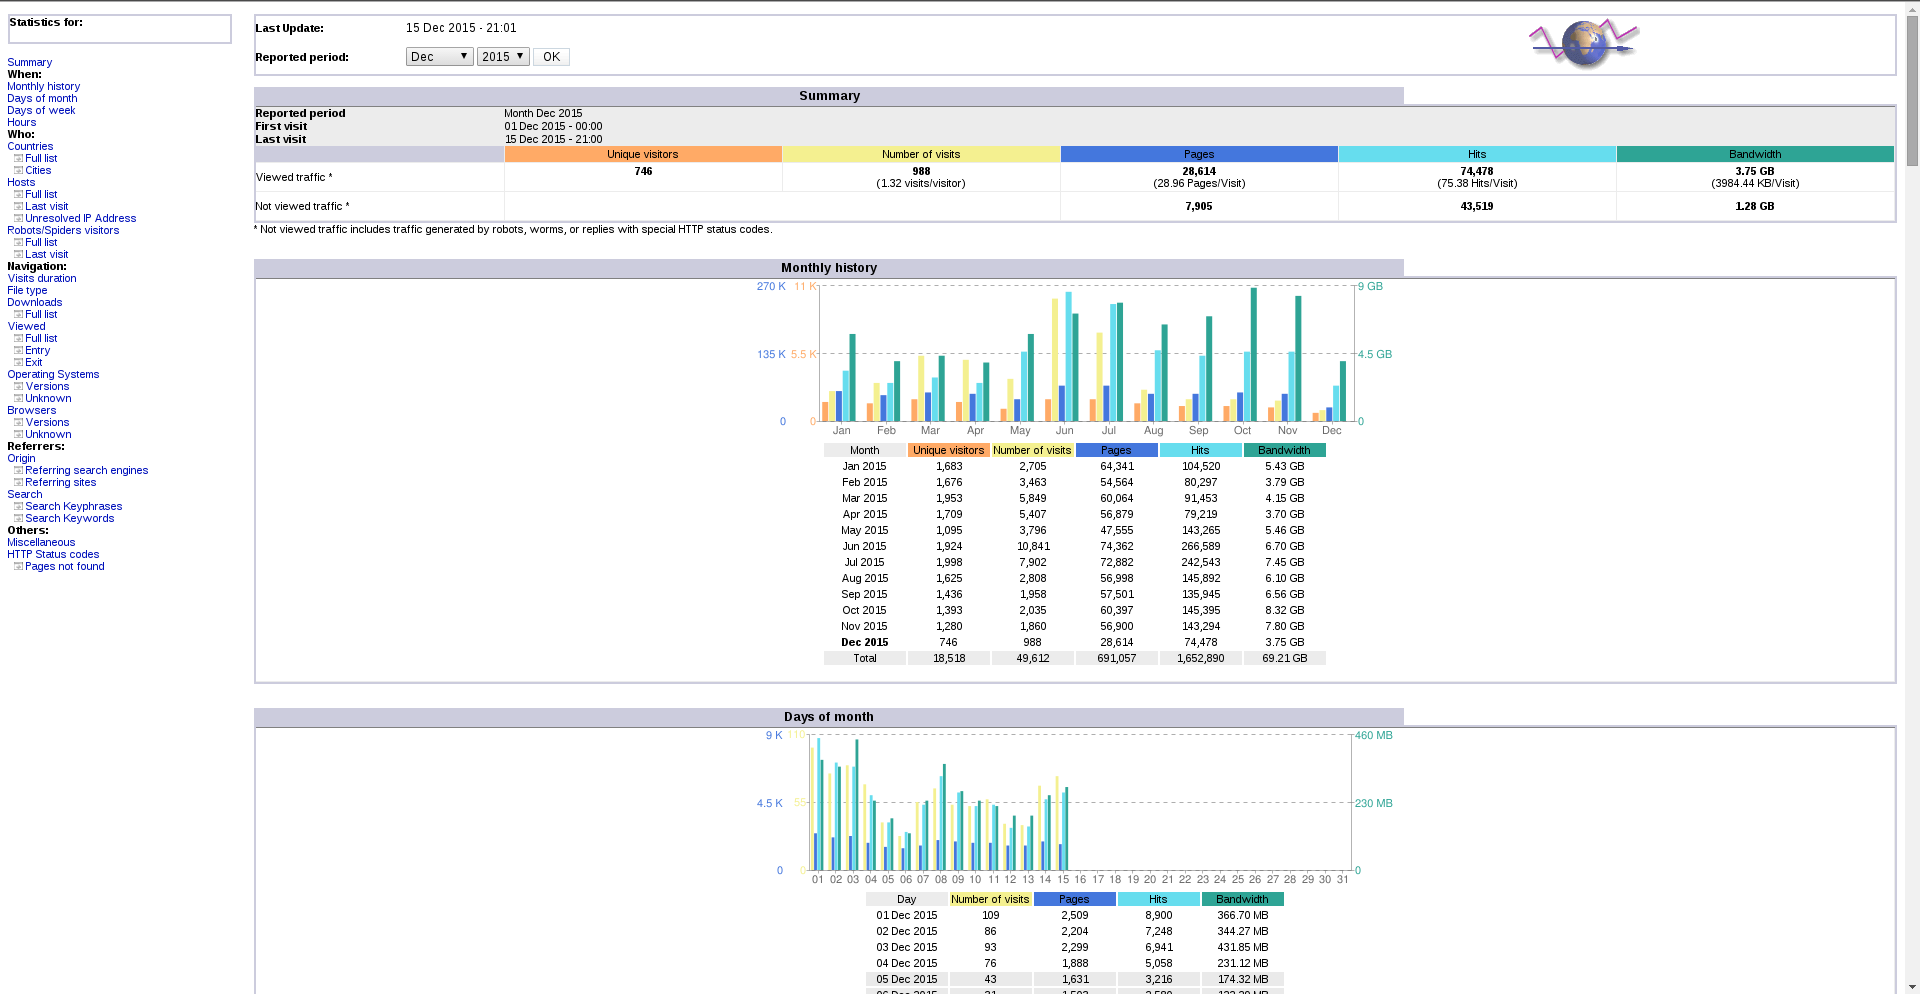
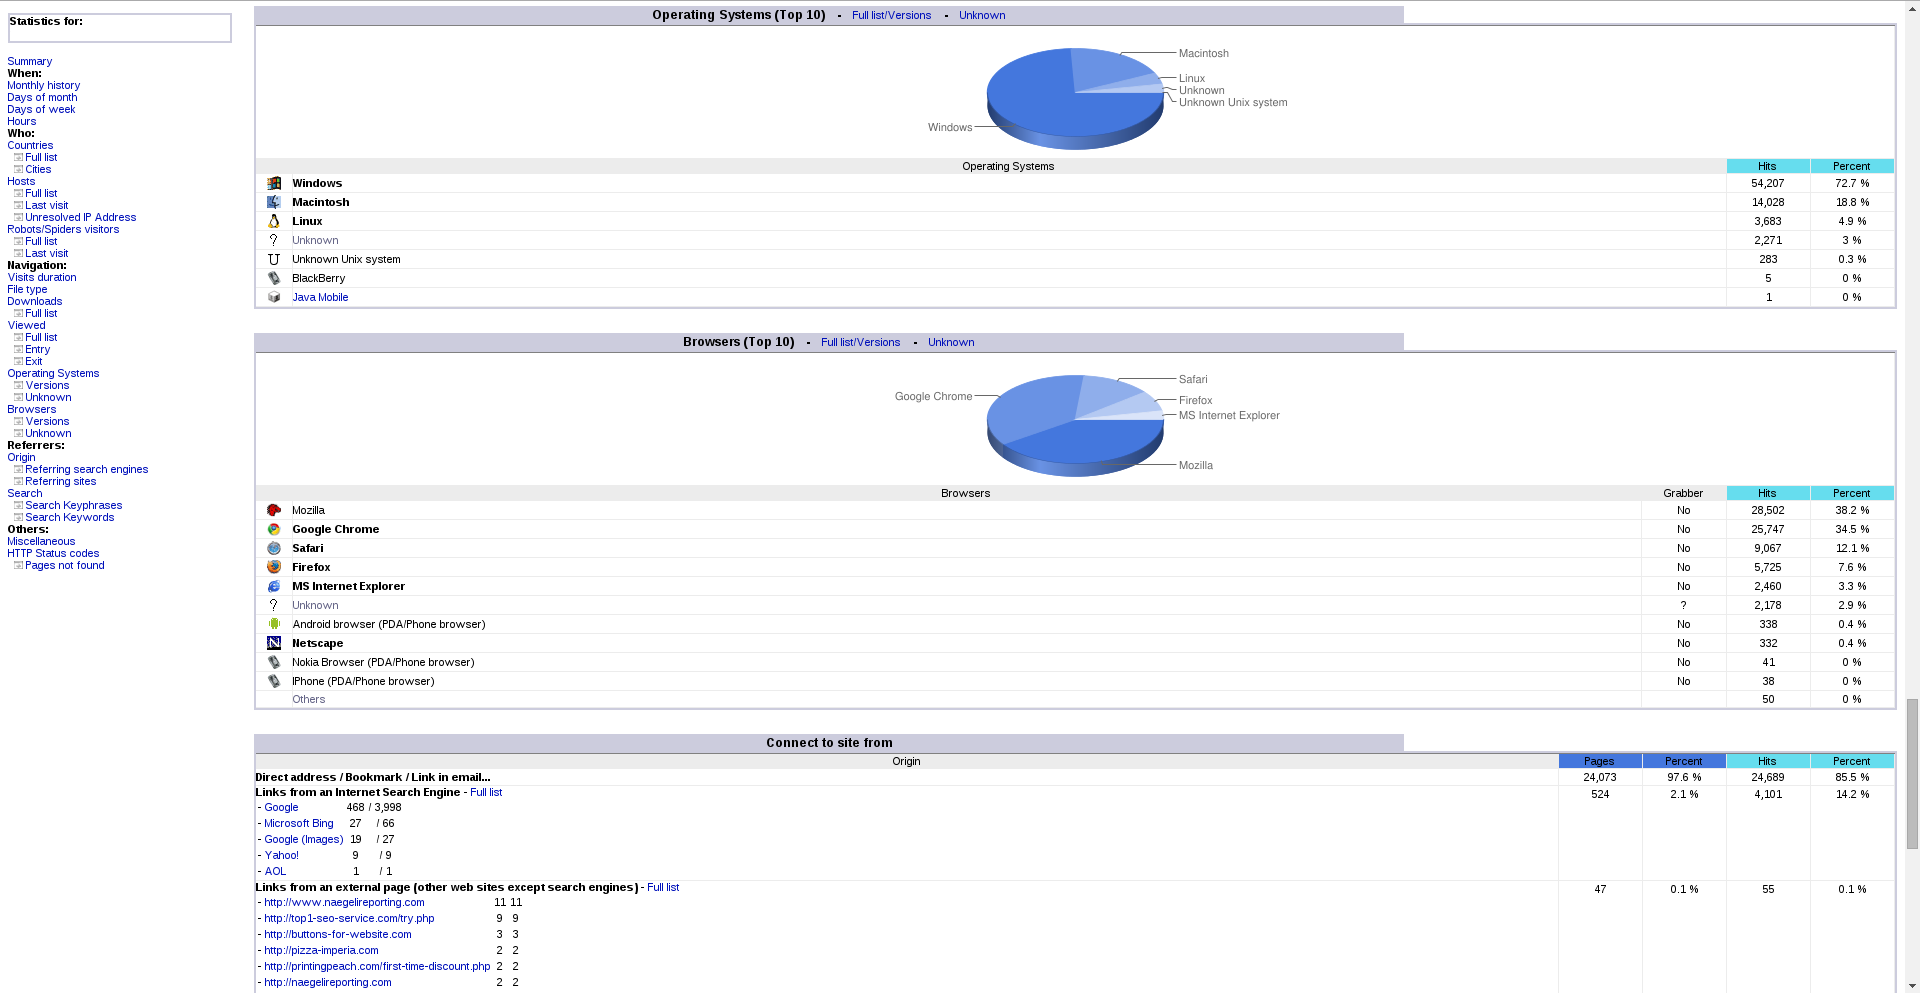
You should now be able to go to: http://stats.example.com/ or http://stats.example.com/cgi-bin/awstats.pl and see your sites stats.
Common mistakes are: Typos, file permissions, file ownership, improper or conflicting Apache httpd Options directives or other Apache httpd config errors. The first place to check is always the error logs specified in your VirtualHost config above.
Incorrect SElinux context:
ls -alsZ /var/lib/GeoIP/
Output:
1 2 | -rw-r--r-- root root system_u:object_r:var_lib_t GeoIP.dat -rw-r--r-- root root system_u:object_r:var_lib_t GeoLiteCity.dat |
Fix:
1 2 | sudo chcon -t httpd_sys_content_t /var/lib/GeoIP/GeoIP.dat sudo chcon -t httpd_sys_content_t /var/lib/GeoIP/GeoLiteCity.dat |
Correct SElinux context:
ls -alsZ /var/lib/GeoIP/
Output:
1 2 | -rw-r--r-- root root system_u:object_r:httpd_sys_content_t GeoIP.dat -rw-r--r-- root root system_u:object_r:httpd_sys_content_t GeoLiteCity.dat |
You should be able to see country/city GeoIP data now if you refresh the page.