
Description
Software Tools Needed
Installing Android 6.0
Android 6.0 to 6.0.1
Optional Steps: Custom Recovery
Optional Steps: Device Rooting
Optional Steps: Linux on Android
This document will explain how to install Android 6.0 or install / update to Android 6.0.1. Other topics covered are custom recovery images and rooting the device.
Software Tools Needed
These things will be needed at various stages to facilitate the install process. In this document we’re using a Google Nexus 5 by LG, codename “Hammerhead”.
Android Developer
http://developer.android.com/about/versions/marshmallow/index.html
Android Studio & SDK (Software Development Kit)
http://developer.android.com/sdk/index.html
http://developer.android.com/sdk/index.html#Other
Alternatively, adb_tools_treiber.zip (Recommended)
https://drive.google.com/file/d/0BwY1hTQPtoEQSU9aZ19kUEgwYUU/view?pref=2&pli=1
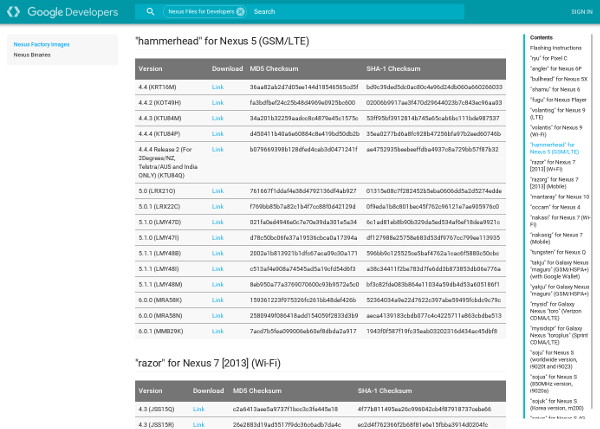
Google Nexus Factory Android Images
https://developers.google.com/android/nexus/images?hl=en
Google USB Driver
http://developer.android.com/sdk/win-usb.html
ADB (Android Debug Bridge) Commands & Help
http://developer.android.com/tools/help/adb.html
ADB (Android Debug Bridge) Driver
http://adbdriver.com/downloads/
TWRP Recovery
https://twrp.me/Devices/
Screenshots

Installing Android 6.0
Here we’ll be installing Android 6.0. Since we’re coming from a pre-6.0 version of Android we’ll wipe all previous data. Make sure you’ve backed up your apps and data before proceeding.
- Extract the Android factory image you downloaded and locate the following files:
- bootloader-hammerhead-hhz12k.img
- radio-hammerhead-m8974a-2.0.50.2.27.img
- boot.img
- system.img
- cache.img
- userdata.img
- recovery.img
- Move these files to the following directory
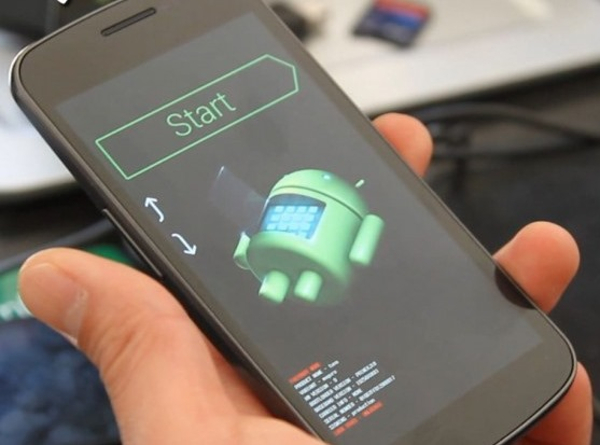
- Boot your phone into the recovery mode (see screenshots)
- Depending on the recovery image you have installed, locate and delete/wipe the following:
- Cache partition
- Dalvik Cache
- Factory Reset data
- Reboot your phone into the bootloader mode (see screenshots)
- Navigate on the command line to the following directory where you unzipped adb-tools_treiber on your computer
- From the command line in the above directory, give the following commands after letting each previous command complete:
- Install Android Bootloader
- Install Device Radio Firmware
- Install Android Boot Partition
- Install Android System
- Install Android System Cache Partition
- Install Android Userdata
- Install Android Recovery (see optional recovery)
/adb-tools_treiber/adb-tools/
/adb-tools_treiber/adb-tools/
fastboot flash bootloader bootloader-hammerhead-hhz12k.img
fastboot reboot-bootloader
fastboot flash radio radio-hammerhead-m8974a-2.0.50.2.27.img
fastboot reboot-bootloader
fastboot flash boot boot.img
fastboot flash system system.img
fastboot flash cache cache.img
fastboot flash userdata userdata.img
fastboot flash recovery recovery.img
Updating a currently running Android 6.0 system to 6.0.1
Here we’ll update Android 6.0 to 6.0.1 and preserve the apps and data. As always, Make sure you’ve backed up your apps and data before proceeding
- Download the Android 6.0.1 full image for your Nexus device.
- Extract the files and locate the following 3 files:
- radio-hammerhead-m8974a-2.0.50.2.28.img
- boot.img
- system.img
- twrp-3.0.0-0-hammerhead.img (Optional)
- Move these files to the following directory
- Boot your phone into the bootloader mode (see screenshots)
- Navigate on the command line to the following directory where you unzipped adb-tools_treiber.zip on your computer
- From the command line in the above directory:
- Install Device Radio Firmware
- Install Android Bootloader
- Install Android System
https://developers.google.com/android/nexus/images?hl=en
/adb-tools_treiber/adb-tools/
/adb-tools_treiber/adb-tools/
fastboot flash radio radio-hammerhead-m8974a-2.0.50.2.28.img
fastboot reboot-bootloader
fastboot flash boot boot.img
fastboot flash system system.img
Optional Steps: Alternate TWRP Recovery Image
Installing the alternate TWRP recovery image on your device for added features and benefits. This is safe to do and will not damage your phone. There are several alternative recovery images and system managers beside TWRP such as ClockworkMod. Read more about recovery mods / images at CyanogenMod.
- Download the TWRP recovery image for your Nexus device.
- Move these files to the following directory
- Boot your phone into the bootloader mode
- Navigate to the following directory where you unzipped adb-tools_treiber.zip on your computer
- From the command line in the above directory, give the following command:
/adb-tools_treiber/adb-tools/
/adb-tools_treiber/adb-tools/
fastboot flash recovery twrp-2.8.7.1-hammerhead.img
Optional Steps: Device Rooting
Using TWRP Recovery image we’ll boot the system into recovery mode and install the .zip files below to gain root access to the system.
WARNING: Security Note: Rooting your phone will make it less secure by default but give you more control over certain aspects of the system. Developers will want this for testing or otherwise exploring the device unhindered. For standard users that do not understand the implications of these steps, stop and do not proceed.
- Install TWRP Recovery image (see above)
- Install ElementalX Kernel
- Install SuperSU (Android 6.0.x)
fastboot flash recovery twrp-2.8.7.1-hammerhead.img
Download the following files using your phone’s web browser, the reboot your phone into TWRP and install the zips from your phone’s Downloads folder in order below: first ElementalX, then SuperSU.
N5-ElementalX-6.0.zip (Android 6.0.x)
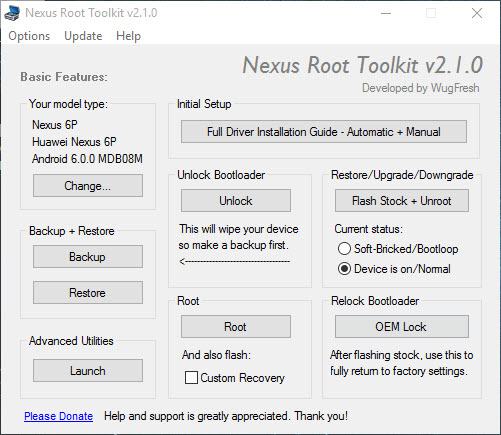
Note: If you have a problem with the battery displaying as “4,012%” or similar, download WugFresh Nexus Root Toolkit v2.1.0 – NRT_v2.1.0.sfx.exe
- Re-flash system.img and boot.img (will not destroy data or user info)
- Reboot and verify the battery indicator is back to normal and reading correctly
- Reboot into TWRP recovery and install SuperSU-v2.64.zip or higher
- Clear / delete the Dalvik Cache and Cache
- Reboot the system, *declining* the message from TWRP that your device is not rooted,
After doing this your phone should be rooted and the battery indicator fixed.
Note: After doing this, every time you boot into TWRP recovery (until an update fixes it), it will always ask on exit / reboot if you want to root your device. It’s important you say “no” to this every time or the battery issues will start again.
Optional Steps: Linux Distro on Android
Install your distro of Linux on your Android device.