Description
iCinga is a scalable and extensible open source monitoring system which checks the availability of your resources, notifies users of outages and provides extensive BI (Business Intelligence) data. This document will show you how to download, install and configure iCinga for your own subdomain “icinga.example.org”
Software Installation
- Add a DNS A-Record or CNAME pointing your preferred subdomain to your server. We’re using “icinga” in this document for our subdomain.
- Add the EPEL Yum software repository.
- Add the IUS Yum software repository.
- Add the iCinga Yum software repository.
- Install the PHP 5.6 modules and dependencies for Apache httpd from IUS and EPEL.
- Install iCinga2 and dependencies.
- Go get a free SSL certificate for added security.
- If it doesn’t already exist, create a default config and edit it like the one below to correspond with your preferred subdomain.
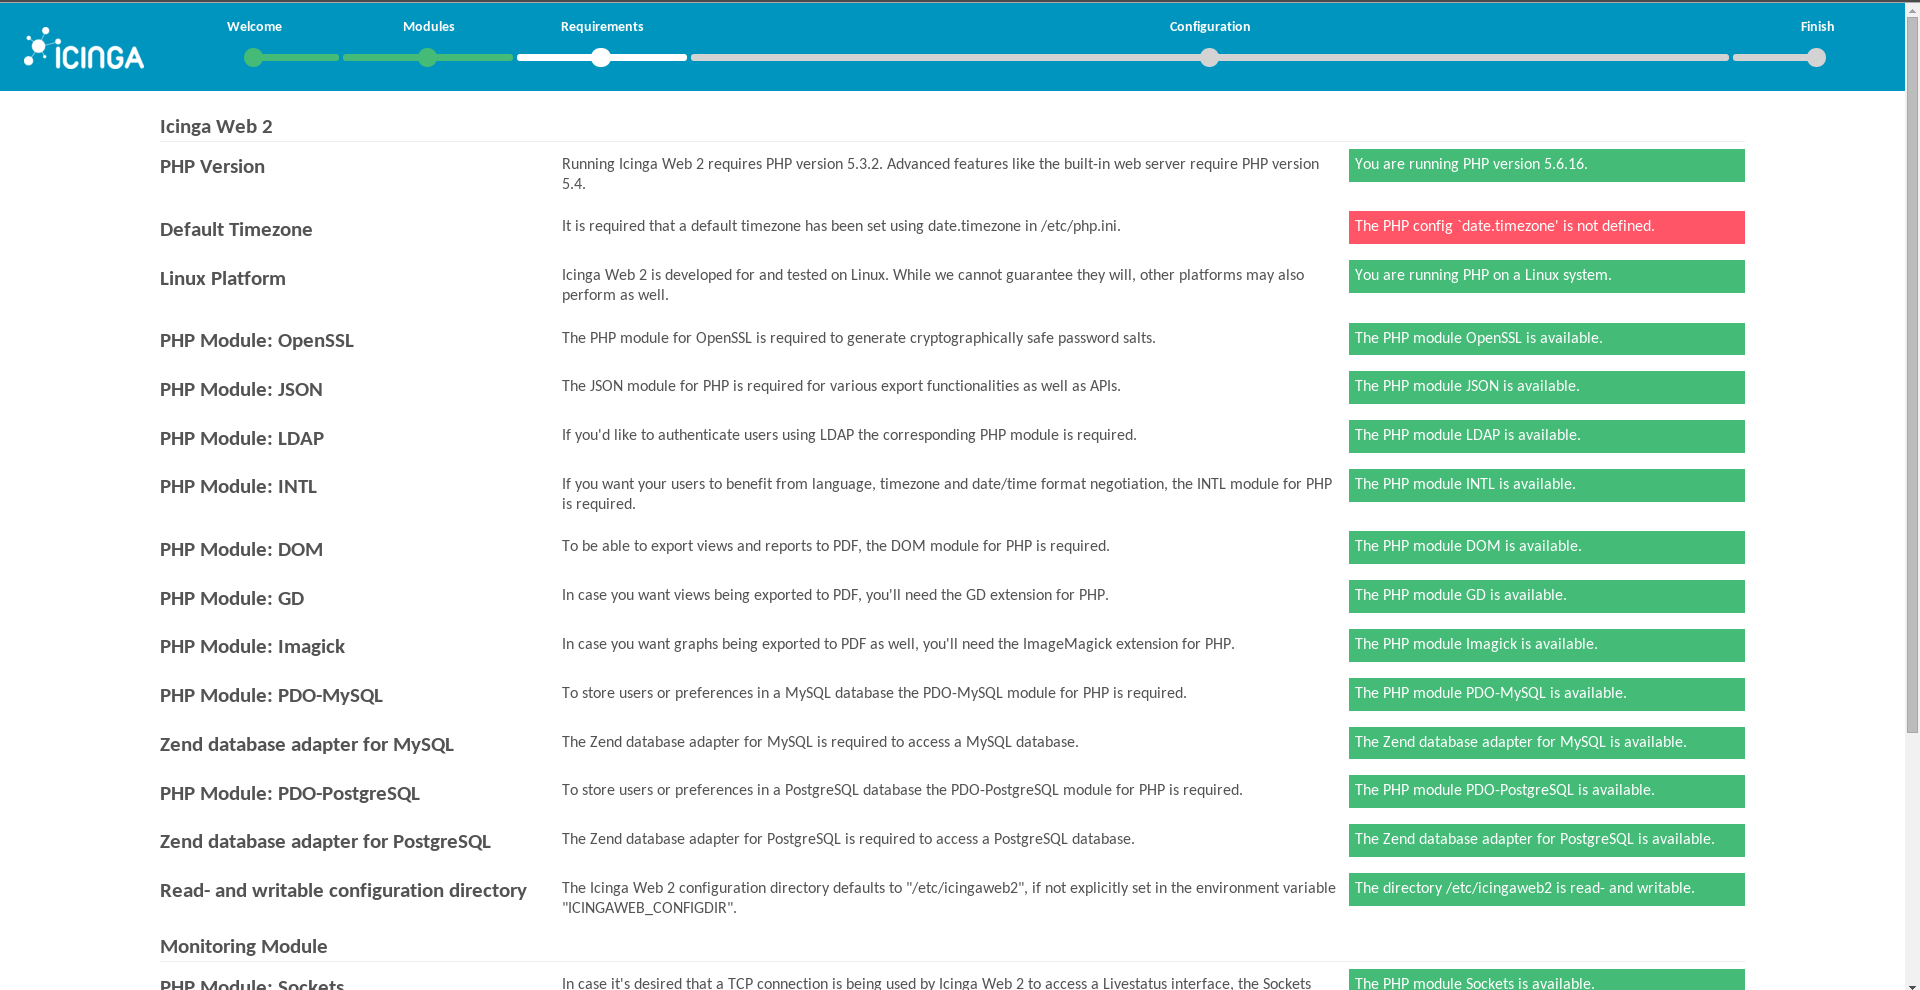
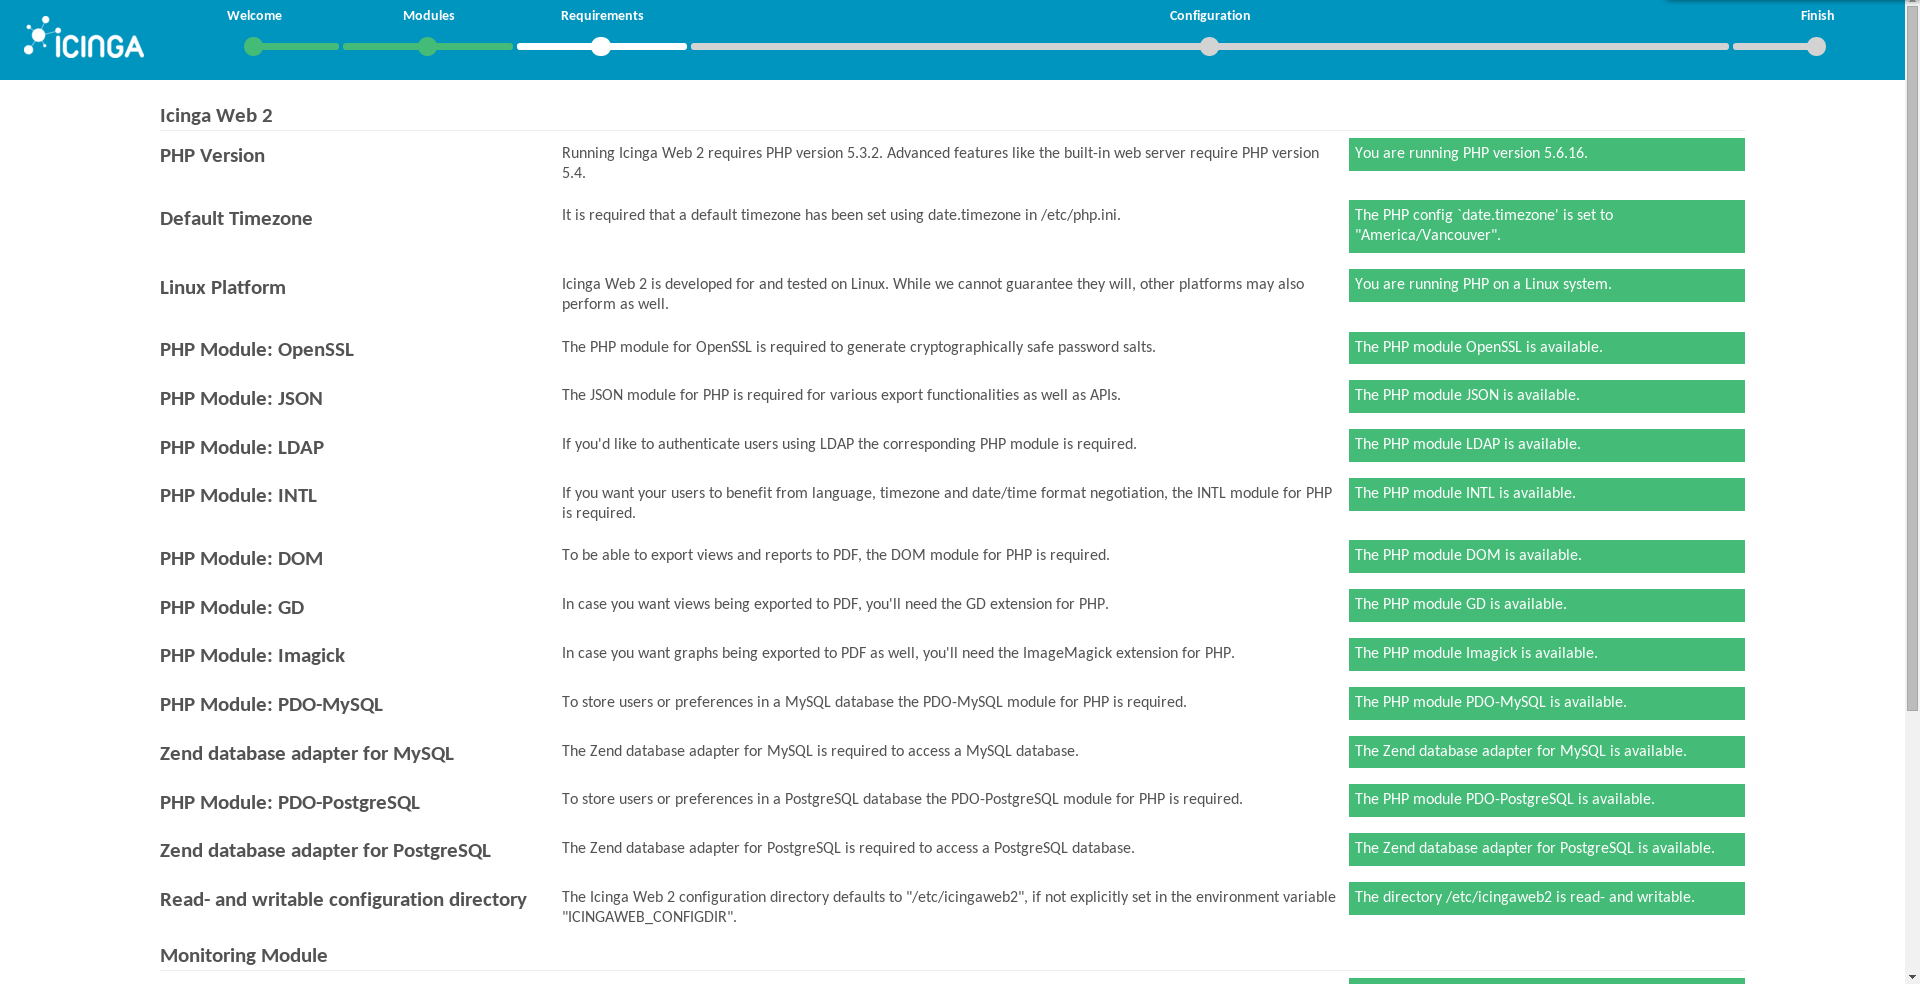
- Edit
/etc/php.iniand find the line “;date.timezone =” and change it to your timezone. - Enable, disable and view status of iCinga features.
- Restart the webserver and iCinga and visit the expected subdomain.
- Setup MySQL / MariaDB databases and database users.
- Load IDO and Web schemas for MySQL / MariaDB.
- Edit IDO config database user credentials.
- Restart the icinga2 service.
C6: rpm -Uvh https://dl.fedoraproject.org/pub/epel/epel-release-latest-6.noarch.rpm
C7: rpm -Uvh https://dl.fedoraproject.org/pub/epel/epel-release-latest-7.noarch.rpm
C6: rpm -Uvh https://centos6.iuscommunity.org/ius-release.rpm
C7: rpm -Uvh https://centos7.iuscommunity.org/ius-release.rpm
cd /etc/yum.repos.d && wget http://packages.icinga.org/epel/ICINGA-release.repo
nano /etc/yum.repos.d/icinga-stable.repo
1 2 3 4 5 6 | [icinga-stable-release] name=ICINGA (stable release for epel) baseurl=http://packages.icinga.org/epel/$releasever/release/ enabled=1 gpgcheck=1 gpgkey=http://packages.icinga.org/icinga.key |
1 | yum install php56u-pear php56u-imap php56u-gd php56u-intl php56u-common php56u-pecl-jsonc-devel php56u-pecl-apcu php56u-bcmath php56u-fpm php56u-pecl-imagick php56u-pgsql php56u-cli php56u-devel php56u-pecl-geoip php56u-ldap php56u-opcache php56u-xmlrpc php56u-xml php56u-pecl-jsonc php56u-mysqlnd php56u-tidy php56u php56u-mcrypt php56u-process php56u-pdo php56u-mbstring |
1 | yum install icinga2-bin icinga2-classicui-config icinga2-common icinga2-doc icinga2-ido-mysql icingacli icingaweb2 icingaweb2-common icingaweb2-vendor-HTMLPurifier icingaweb2-vendor-JShrink icingaweb2-vendor-Parsedown icingaweb2-vendor-Zend icingaweb2-vendor-dompdf icingaweb2-vendor-lessphp php-Icinga icinga2 |
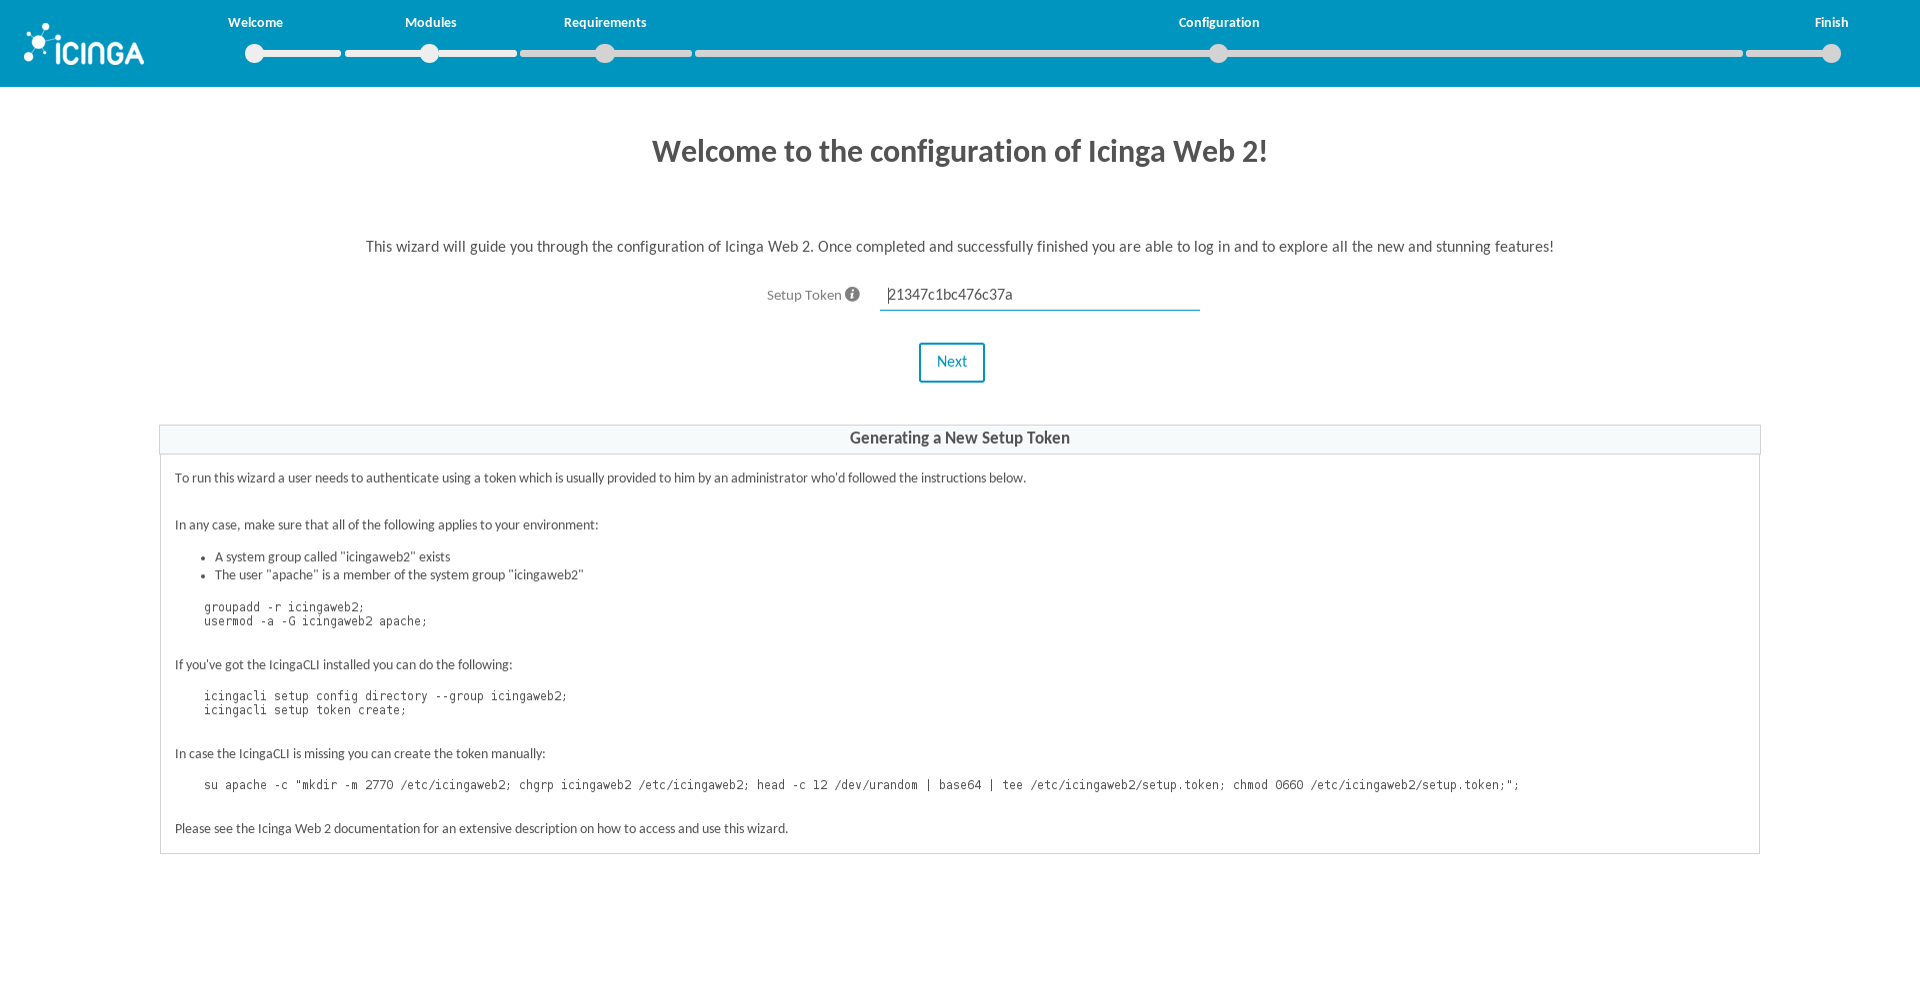
Setup Installation Token
icingacli setup token create
The newly generated setup token is: 21347c1bc476c37a
icingacli setup token show
The current setup token is: 21347c1bc476c37a
Webserver setup
Create a default config at: /etc/httpd/conf.d/icingaweb2.conf
icingacli setup config webserver apache
Or copy and modify the following config and put it in: /etc/httpd/conf.d/icingaweb2.conf
1 2 3 4 5 6 7 8 9 10 11 12 13 14 15 16 17 18 19 20 21 22 23 24 25 26 27 28 29 30 31 32 33 34 35 36 37 38 39 40 41 42 43 44 45 46 47 48 49 50 51 52 53 54 55 56 57 58 59 60 61 62 63 64 65 66 67 68 69 70 71 72 73 74 75 76 77 78 79 80 81 82 83 84 85 86 87 88 89 90 91 92 93 94 95 96 97 98 99 100 101 102 103 104 105 106 107 108 109 110 111 112 113 114 115 116 117 118 119 120 121 122 123 124 125 126 127 128 129 130 131 132 133 134 135 136 137 138 139 140 141 | ########################## ### Apache httpd vhost ### ########################## <VirtualHost *:80> ## General setup for the normal virtual host redirect to SSL ## ServerAdmin root@localhost ServerName icinga.example.org DocumentRoot /usr/share/icingaweb2/public CustomLog logs/icinga.example.org_access_log combined TransferLog logs/icinga.example.org_xfer_log ErrorLog logs/icinga.example.org_error_log Redirect Permanent / https://icinga.example.org </VirtualHost> ############################## ### Apache httpd SSL vhost ### ############################## <VirtualHost *:443> ## General setup for the default SSL virtual host ## ServerAdmin root@localhost DocumentRoot /usr/share/icingaweb2/public ServerName icinga.example.org FallbackResource /index.php ## Enable HSTS HTTP Strict Transport Security ## Header always set Strict-Transport-Security "max-age=63072000; includeSubdomains; preload" ## Log Files ## ErrorLog logs/icinga.example.org_ssl_error_log TransferLog logs/icinga.example.org_ssl_transfer_log CustomLog logs/icinga.example.org_ssl_access_log LogLevel warn ## Enable/Disable SSL ## SSLEngine On ## SSL Protocol support ## SSLProtocol All -SSLv2 -SSLv3 ## SSL Cipher Suite ## SSLHonorCipherOrder On SSLCipherSuite TLS_ECDHE_RSA_WITH_AES_128_CBC_SHA:TLS_ECDHE_RSA_WITH_AES_256_CBC_SHA:TLS_ECDHE_RSA_WITH_3DES_EDE_CBC_SHA:EECDH+ECDSA+AESGCM:EECDH+aRSA+AESGCM:EECDH+ECDSA+SHA384:EECDH+ECDSA+SHA256:EECDH+aRSA+SHA384:EECDH+aRSA+SHA256:EECDH+aRSA+RC4:EECDH:EDH+aRSA:EECDH+AESGCM:EDH+AESGCM:AES256+EECDH:AES256+EDH:ECDHE-RSA-AES256-GCM-SHA384:ECDHE-RSA-AES128-GCM-SHA256:ECDHE-ECDSA-AES256-GCM-SHA384:ECDHE-ECDSA-AES128-GCM-SHA256:ECDHE-ECDSA-AES256-SHA384:ECDHE-ECDSA-AES256-SHA:ECDHE-ECDSA-AES128-SHA256:ECDHE-ECDSA-AES128-SHA:kEDH+AESGCM:DHE-RSA-AES256-GCM-SHA384:DHE-RSA-AES128-GCM-SHA256:DHE-DSS-AES128-GCM-SHA256:ECDHE-RSA-AES256-SHA384:ECDHE-RSA-AES128-SHA256:ECDHE-RSA-AES256-SHA:ECDHE-RSA-AES128-SHA:DHE-RSA-AES256-SHA256:DHE-RSA-AES128-SHA256:DHE-RSA-AES256-SHA:DHE-RSA-AES128-SHA:DHE-DSS-AES128-SHA256:DHE-DSS-AES256-SHA:ECDHE-RSA-DES-CBC3-SHA:EDH-RSA-DES-CBC3-SHA:AES256-GCM-SHA384:AES128-GCM-SHA256:AES256-SHA256:AES128-SHA256:AES256-SHA:AES128-SHA:AES256:AES128:AES:DES-CBC3-SHA:HIGH:!aNULL:!eNULL:!EXPORT:!DES:!MD5:!PSK:!RC4 ## Server Certificate ## SSLCertificateFile /etc/pki/tls/certs/example.org.ssl.crt ## Server Private Key ## SSLCertificateKeyFile /etc/pki/tls/private/example.org.nopass.key ## Certificate Authority (CA) ## SSLCACertificateFile /etc/pki/tls/certs/start-ssl-ca-sha2.pem ## Server Certificate Chain ## SSLCertificateChainFile /etc/pki/tls/certs/sub.class1.server.ca.pem <Directory /var/www/example.com/> <Files ~ "\.(cgi|shtml|phtml|php3?)$"> SSLOptions +StdEnvVars </Files> </Directory> <Directory "/var/www/example.com/cgi-bin"> SSLOptions +StdEnvVars </Directory> ## iCinga ## <Directory /usr/share/icingaweb2/public> Options SymLinksIfOwnerMatch AllowOverride None <IfModule mod_authz_core.c> # Apache 2.4 <RequireAll> Require all granted </RequireAll> </IfModule> <IfModule !mod_authz_core.c> # Apache 2.2 Order allow,deny Allow from all </IfModule> SetEnv ICINGAWEB_CONFIGDIR "/etc/icingaweb2" EnableSendfile Off <IfModule mod_rewrite.c> RewriteEngine on RewriteBase / RewriteCond %{ENV:REDIRECT_STATUS} ^$ RewriteCond %{REQUEST_FILENAME} -s [OR] RewriteCond %{REQUEST_FILENAME} -l [OR] RewriteCond %{REQUEST_FILENAME} -d RewriteRule ^.*$ - [NC,L] RewriteRule ^.*$ index.php [NC,L] </IfModule> <IfModule !mod_rewrite.c> DirectoryIndex error_norewrite.html ErrorDocument 404 /error_norewrite.html </IfModule> </Directory> ## Compress HTML, CSS, JavaScript, Text, XML and fonts with mod_deflate ## AddOutputFilterByType DEFLATE application/javascript AddOutputFilterByType DEFLATE application/rss+xml AddOutputFilterByType DEFLATE application/vnd.ms-fontobject AddOutputFilterByType DEFLATE application/x-font AddOutputFilterByType DEFLATE application/x-font-opentype AddOutputFilterByType DEFLATE application/x-font-otf AddOutputFilterByType DEFLATE application/x-font-truetype AddOutputFilterByType DEFLATE application/x-font-ttf AddOutputFilterByType DEFLATE application/x-javascript AddOutputFilterByType DEFLATE application/xhtml+xml AddOutputFilterByType DEFLATE application/xml AddOutputFilterByType DEFLATE font/opentype AddOutputFilterByType DEFLATE font/otf AddOutputFilterByType DEFLATE font/ttf AddOutputFilterByType DEFLATE image/svg+xml AddOutputFilterByType DEFLATE image/x-icon AddOutputFilterByType DEFLATE text/css AddOutputFilterByType DEFLATE text/html AddOutputFilterByType DEFLATE text/javascript AddOutputFilterByType DEFLATE text/plain AddOutputFilterByType DEFLATE text/xml ## Remove browser bugs from really old browsers ## BrowserMatch ^Mozilla/4 gzip-only-text/html BrowserMatch ^Mozilla/4\.0[678] no-gzip BrowserMatch \bMSIE !no-gzip !gzip-only-text/html Header append Vary User-Agent ## Expires Caching ## ExpiresActive On ExpiresByType image/jpg "access plus 1 year" ExpiresByType image/jpeg "access plus 1 year" ExpiresByType image/gif "access plus 1 year" ExpiresByType image/png "access plus 1 year" ExpiresByType text/css "access plus 1 month" ExpiresByType application/pdf "access plus 1 month" ExpiresByType text/x-javascript "access plus 1 month" ExpiresByType application/javascript "access 1 month" ExpiresByType application/x-shockwave-flash "access plus 1 month" ExpiresByType image/x-icon "access plus 1 year" ExpiresDefault "access plus 9 days" ## Remove Browswer Entity Tags ## <FilesMatch "\.(ico|pdf|flv|jpg|jpeg|png|gif|js|css|swf)(\.gz)?$"> Header set Expires "Thu, 30 Dec 2021 21:00:00 GMT" Header unset ETag FileETag None </FilesMatch> |
nano /etc/php.ini
;date.timezone = America/Vancouver
icinga2 feature list
Disabled features: api debuglog gelf graphite icingastatus livestatus opentsdb perfdata syslog
Enabled features: checker command compatlog ido-mysql mainlog notification statusdata
icinga2 feature enable perfdata
Enabling feature perfdata. Make sure to restart Icinga 2 for these changes to take effect.
C6: service httpd restart
C7: systemctl restart httpd.service
C6: service icinga2 restart
C7: systemctl restart icinga2.service
http://icinga.example.org
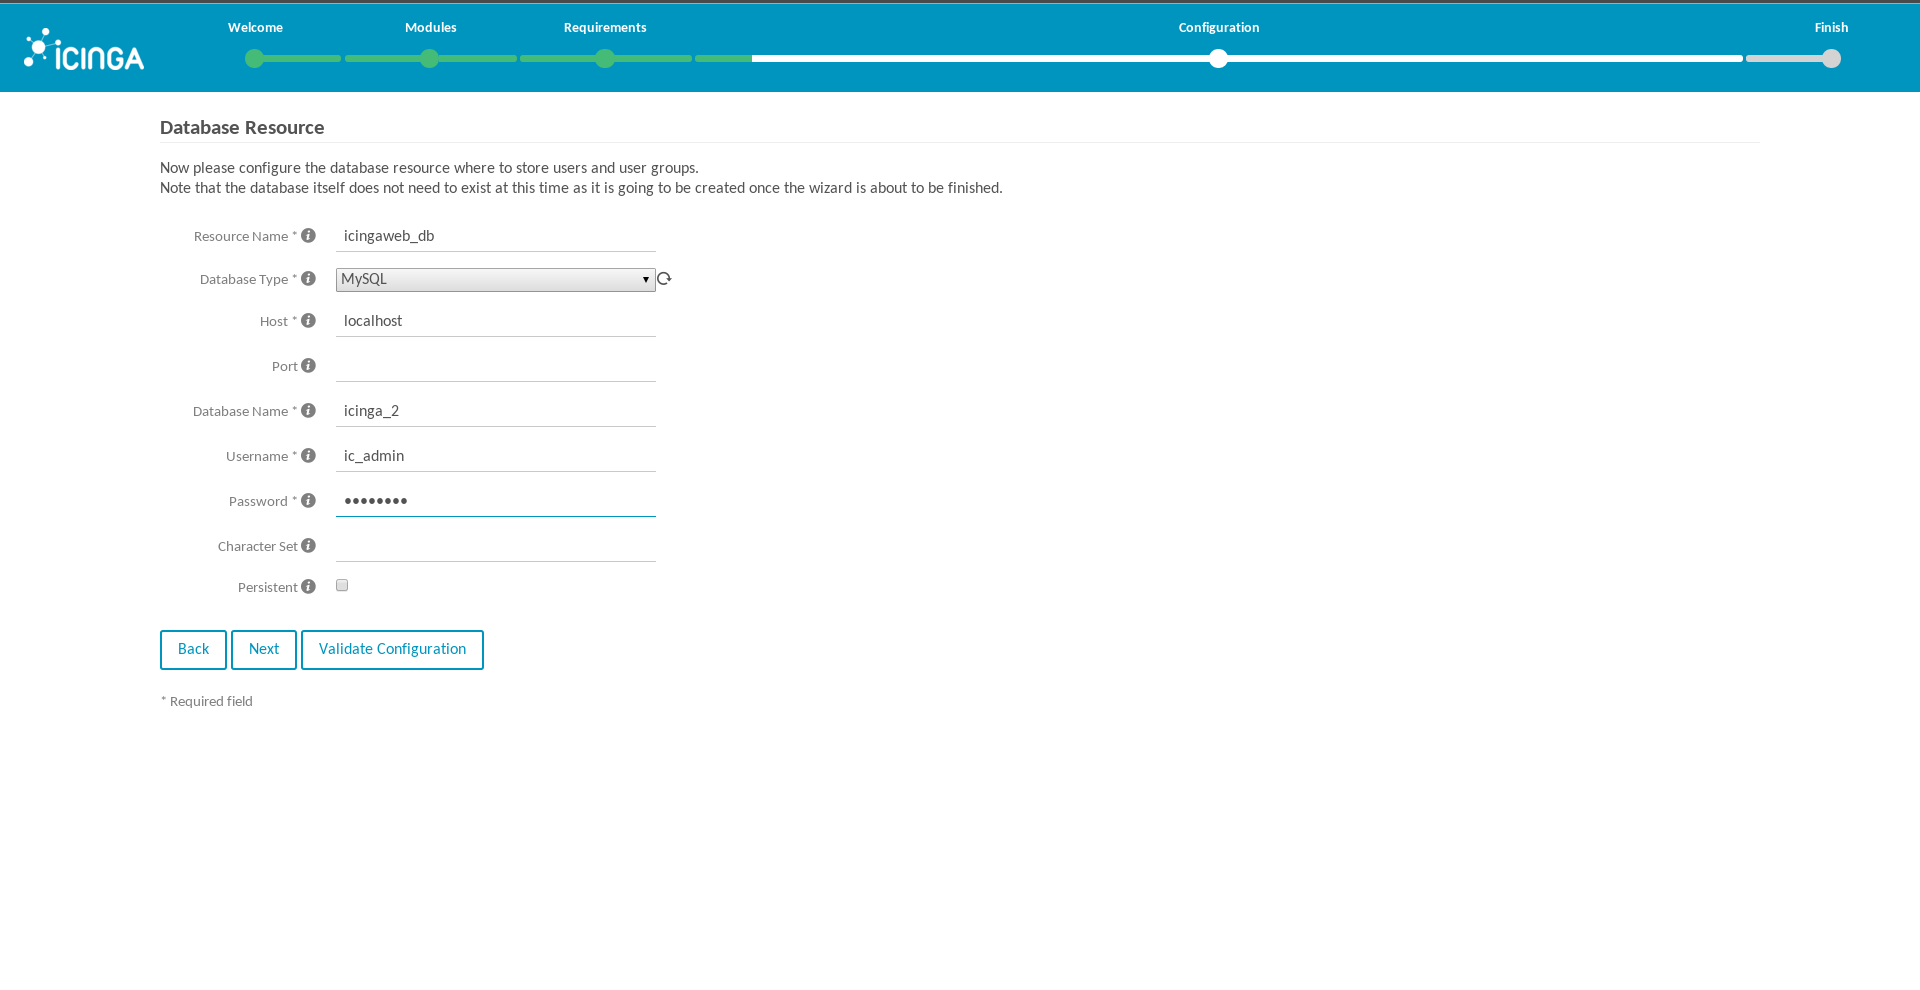
MySQL / MariaDB Database Setup
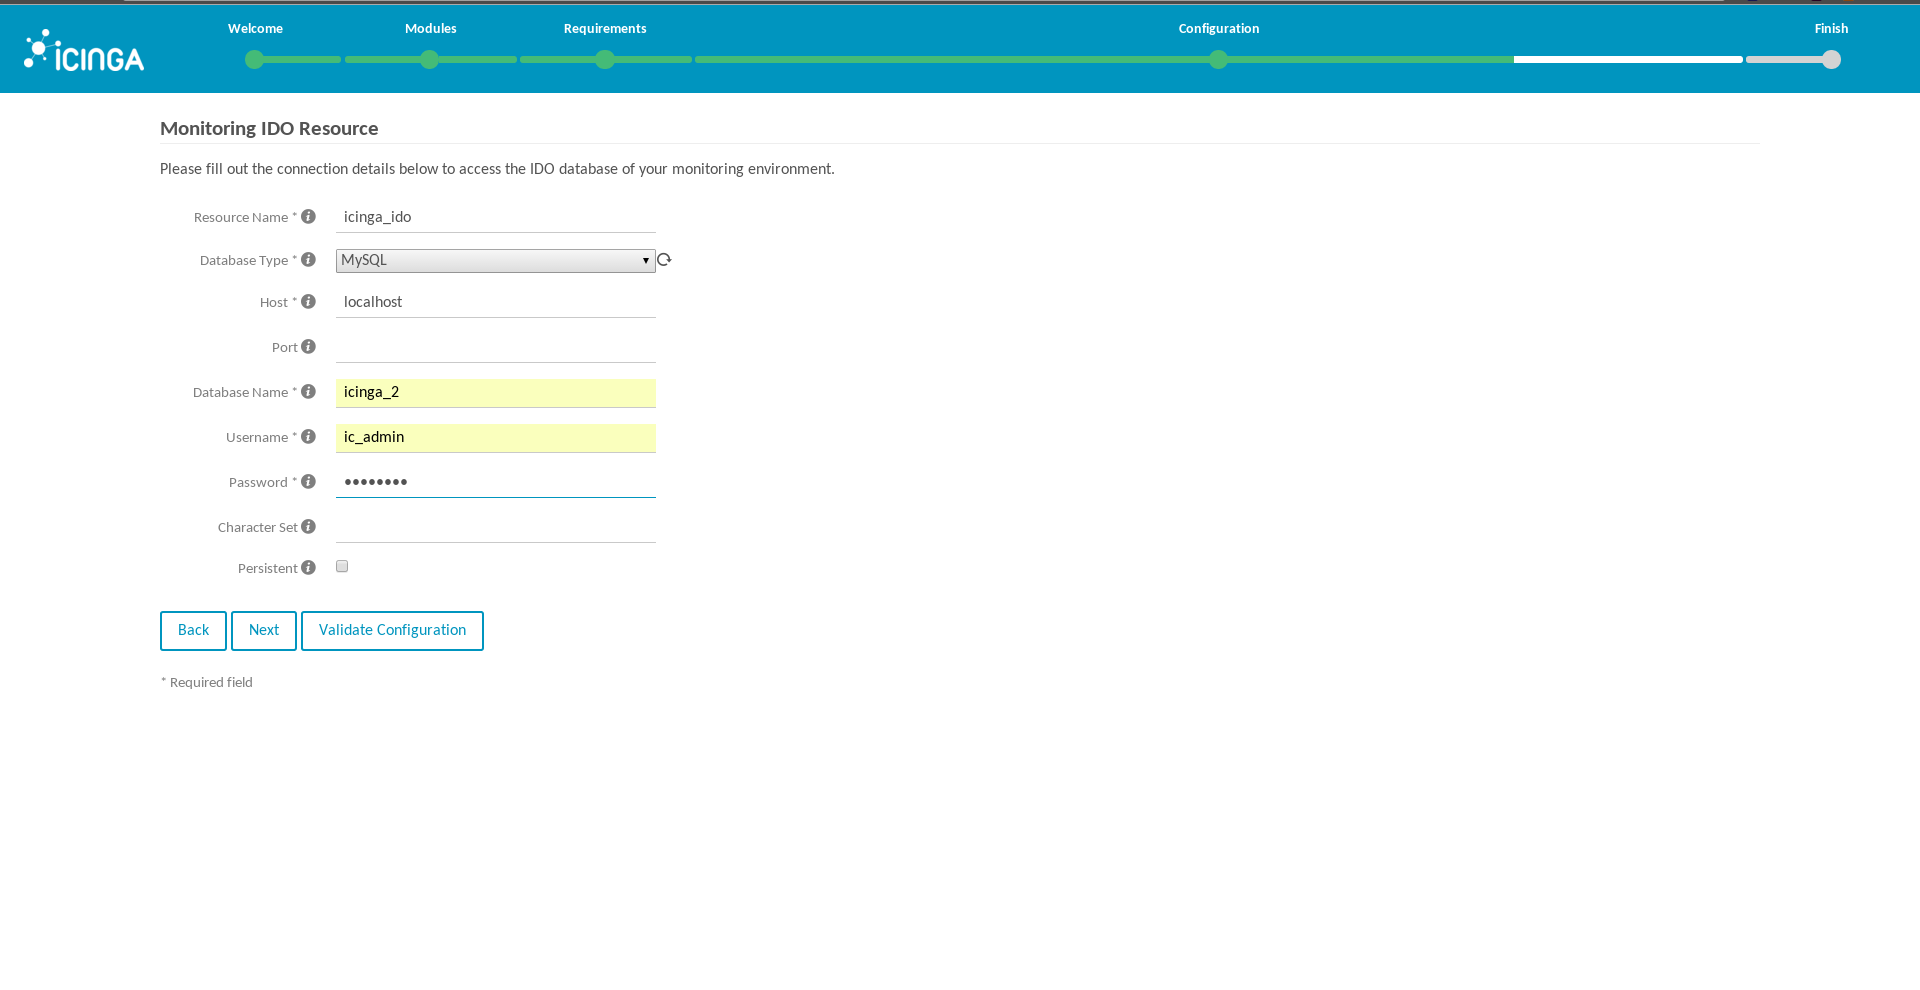
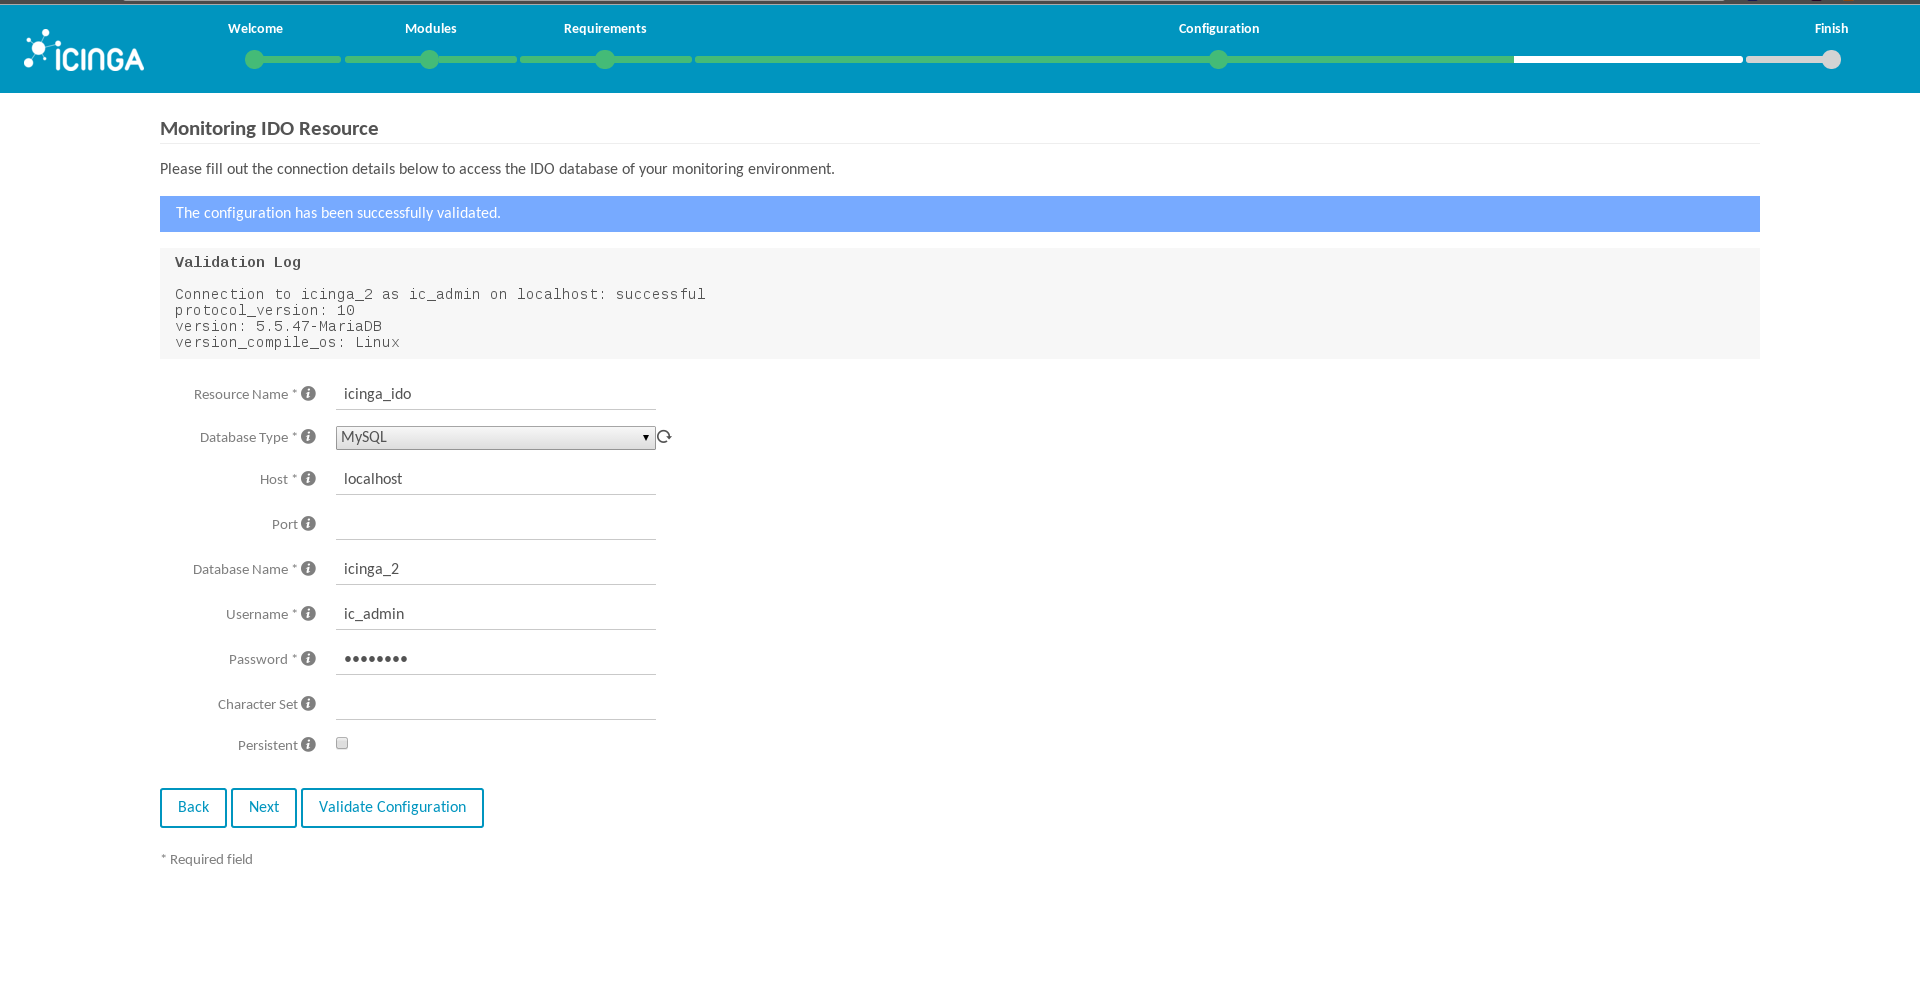
Make sure to remember your database name, database username and database password, the host will be “localhost“.
mysql -p
1 2 3 4 5 6 7 | ####### MariaDB [(none)]> create database icinga_2; MariaDB [(none)]> GRANT ALL PRIVILEGES ON icinga_2.* TO 'ic2_admin'@'localhost' IDENTIFIED BY 'strong_password'; MariaDB [(none)]> create database icinga_web; MariaDB [(none)]> GRANT ALL PRIVILEGES ON icinga_web.* TO 'icw_admin'@'localhost' IDENTIFIED BY 'strong_password'; ####### |
mysql -u warren -ppassword icinga_2 < /usr/share/icinga2-ido-mysql/schema/mysql.sql
mysql -u warren -ppassword icinga_web < /usr/share/doc/icingaweb2/schema/mysql.schema.sql
If the installer is not able to write this info, you can insert it manually rather than granting the webserver privileges to write in this one file one time,
nano /etc/icinga2/features-enabled/ido-mysql.conf
1 2 3 4 5 6 | object IdoMysqlConnection "ido-mysql" { user = "ic2_admin" password = "strong_password" host = "localhost" database = "icinga_2" } |
C6: service icinga2 restart
C7: systemctl restart icinga2.service
Maintenance & Cleanup
When editing the configs, make sure to clean the config cache afterwards by deleting all *.php files in /var/cache/icinga-web/ or invoking
/usr/share/icinga-web/bin/clearcache.sh
Further Reading
- Official iCingaWeb2 README RPM.md for RPM Packages on Github
- Official iCingaWeb2 installation.md on Github.
- iCinga2 Documentation index.
- iCinga Web Config Documentaion.
- Icinga wiki - Setting up iCinga Web on RHEL.