Table of Contents
⊶ Moving WordPress ⊶ Introduction, description & demystification of the process
Moving a WordPress site is, by far, the most popular support topic because it needs to be done fairly regularly for various reasons by a large number of people and the variety of hosting environments and levels of control and knowledge of the person performing the move provides a certain challenge in accurately communicating the process in a single location for the largest number of people.
Once this information is understood and you move a few WordPress sites, you’ll see it’s really very easy, but it’s imperative to understand what’s involved and what we’re doing if we expect a positive and trouble-free result that’s repeatable. If we create a proper mental image of what we’re doing before we begin and actually “see” it in our heads, the likelihood of repeatable success increases.
“Moving” a site is defined as: changing the domain/URL or location (physically or virtually), either by: moving the local (sub)directory or DocumentRoot, moving the site to a new physical server/hosting, completely or in part changing the domain name.
A WordPress site consists of 2 main parts, the database and the DocumentRoot.
• The database contains page text, links, any extra code or text added into the page/post editors or widgets, user account details, various site settings, and other dynamic content. A good way to visualise the database is similar to a case of beer vs. a single bottle. The case represents the database server itself, MySQL / MariaDB, a single bottle represents a database container, the beer inside represents the data within the container or a dump of this data.
• The DocumentRoot contains 2 main components: The WordPress core files (all the files contained in the standard download, wp-admin/, wp-includes/ and the loose files in the DocumentRoot, index.php, wp-config.php, etc) and the wp-content/ directory containing: theme files, plugin files, media uploads, other uploads from forms or other plugins, etc.
Important files and directories in the DocumentRoot to consider:
• .htaccess
• wp-config.php
• /wp-content
Note: WordPress does not store files such as images, documents, etc in the database. This would make most databases extremely large and slow and is very inefficient.
Before we begin
Most importantly, you must *want* to do this and and you *will* succeed.- If you’re developing locally, at the very least you should have an intermediate understanding of: DNS, Apache httpd or nginx, MySQL or MariaDB, FTP, SSH, Linux filesystem management & excellent communication skills. If you do not, when you run into trouble it will be very cumbersome to try and help you.
- For the purposes of this guide we’ll assume: DNS is already functioning, our old site is “example.org“, our new site is called “example.com” and our database name and user are database_name / database_user
- We’ll also assume, if moving to a VPS or dedicated server that you either understand Apache httpd or nginx webserver setup and configuration and related technologies (FTP, SSH, sudo, MySQL / MariaDB) or you have someone on your team that does.
- We’ll also assume a basic understanding of Linux and other commonly related web technologies.
- Remember, we can never teach another, only show what we have done. Anyone can choose to follow step-by-step, ignore, alter, omit or be indifferent to anything presented here. You will only learn by doing this, then doing it again and again and again and helping others do it.
- Despite all of this, howtos, guides and tutorials are for experts, beginners should always read the documentation, which is why you will see so many things here linked back to official documentation. For the simple reason, experts have the ability to determine correct/useful information from incorrect/poor information based on experience and previous knowledge, by definition a new person does not have this advantage.
- Lastly, DO NOT copy/paste *any* commands, configurations or code given here that you do not understand without first researching it independently of this site.
Step 1 ⊶ Make a backup
Description
Making a backup is like packing up your house and moving to a new one, except once it’s backed up we can duplicate the site an infinite amount of times across unlimited domains using that single backup with very little effort. The WordPress site you wish to move from the SOURCE (existing) hosting to the TARGET (new) hosting consists of 2 main parts as referenced above, this is what you’re going to be creating a backup of.
- A database backup using mysqldump or PHPMyAdmin
- A zip or tar of the DocumentRoot
Use *one* of the following methods to create a full backup. It does not matter which, the end result is identical.
- Plugin Method: Get a plugin like Simple Backup
- Manual Method: Manually dump the database and tar or zip the DocumentRoot
The Work
Plugin Method
- Download Simple Backup
- In your WordPress Admin Panel go to: Plugins –> Add New –> Upload plugin –> Choose file –> choose ‘simple-backup.zip’
- Install and activate the plugin
- In your WordPress Admin Panel go to: Tools –> Backup Manager
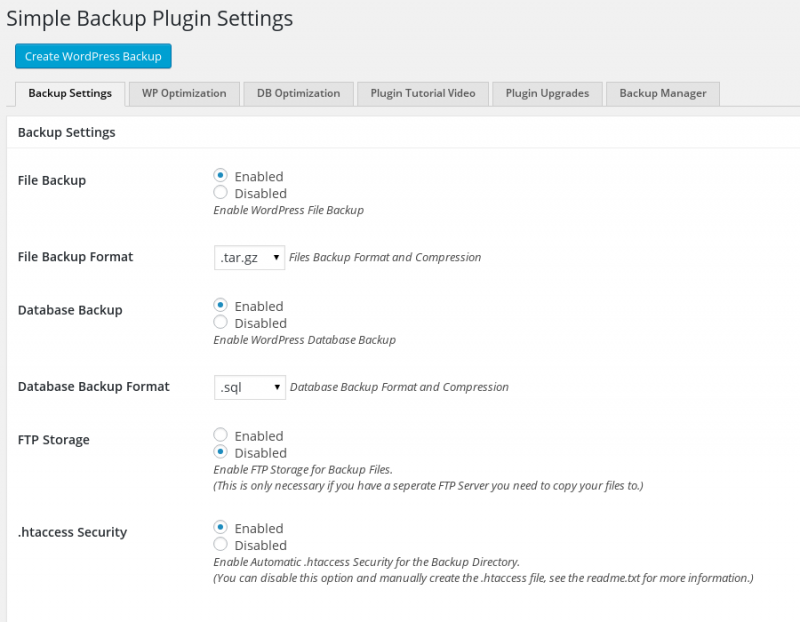
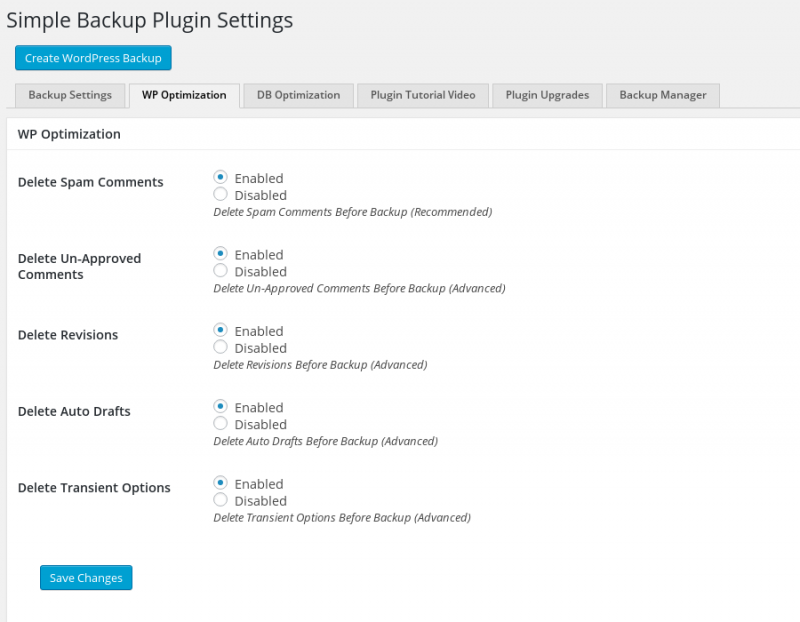
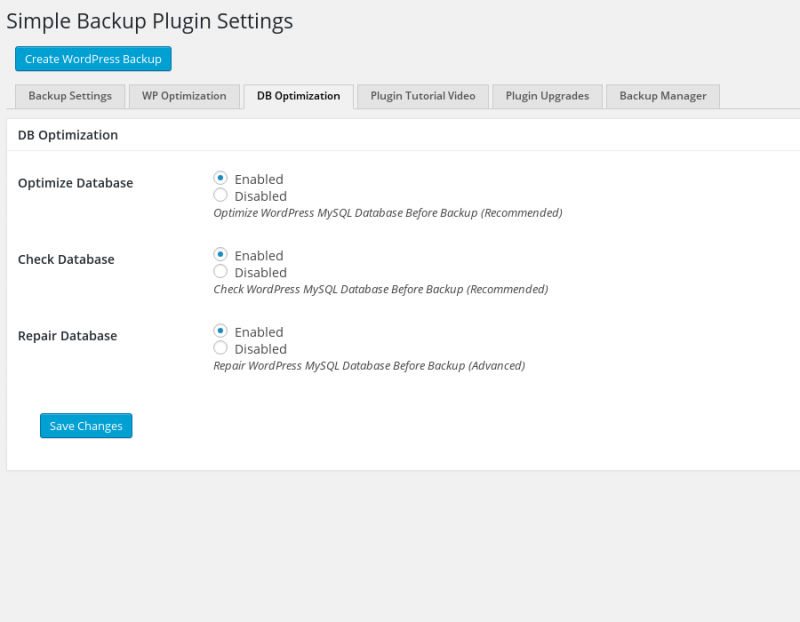
- See screenshots for plugin settings, only the first settings tab is required to successfully create a backup.
- Click the blue “Create WordPress Backup” button at the top of the screen
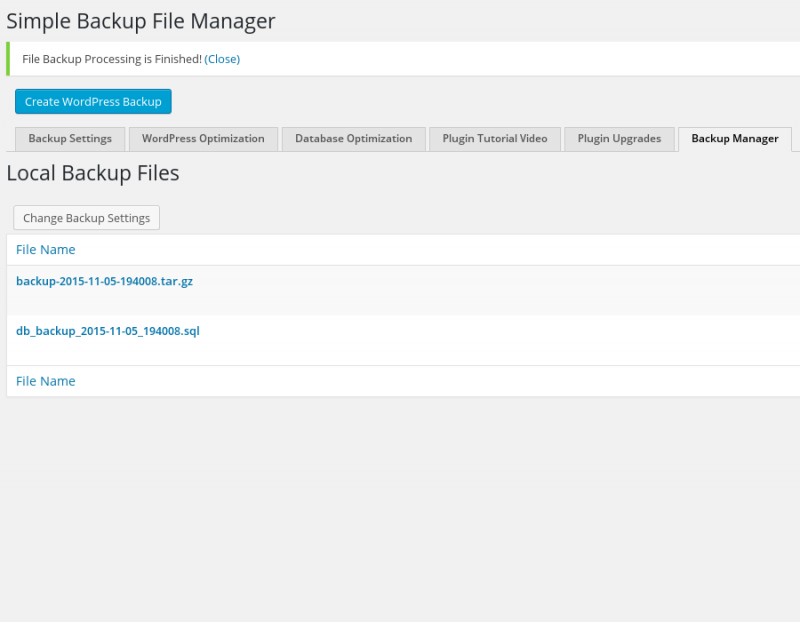
- Download the 2 backup files produced, one is the database dump, the other is the DocumentRoot zipped or tarred up.
backup-2015-10-23-201051.tar.gz - 37.40 MB - 2015-10-23 8:08:53 PM AZOST
db_backup_2015-10-23_201050.sql - 534.67 kB - 2015-10-23 8:08:20 PM AZOST
Manual Method
Notice: This method may require administrative “root” or sudo privileges and/or a database administrator account (DBA) to successfully complete.
(Part 1 – Database dump)
This method only works with SSH or command line access to the Linux system hosting your site and a valid DBA account on your MySQL or MariaDB.
- Login to your SOURCE (existing) hosting via SSH
- Create a directory called “site_move”
mkdir site_move - Move into this newly created directly
cd site_move - Create a database dump
mysqldump -u username -ppassword database_name > database_name.sql
There is no space between the p’s above in -ppassword, this is intended and is not a typo
(Part 2 – Backup DocumentRoot)
On most Unix-like operating systems the DocumentRoots for most sites will be under /var/www, your particular situation may vary but this is a good starting point
- Find your sites DocumentRoot, for our example we’re using /var/www/example.org/ as the DocumentRoot of our WordPress site
- After login
cd site_move; sudo tar -cvzf /var/www/example.org example.org.tar.gz - After this command successfully completes, you should have 2 files in your “site_move” folder:
a. database_name.sql
b. example.org.tar.gz
Step 2 ⊶ Moving the files
Description
However you created the backup in Step 1, now it’s time to move the newly created backup from the SOURCE (existing) to the TARGET (new) hosting
- Using an s/FTP client like FileZilla | A very common, free FTP software for Windows, Linux and OSX
- Server to server using scp | Secure Copy, is based on SSH (Secure Shell) and is probably the fastest method
- Using wget | If your backup is available on the internet, you can use wget to download it to the new VPS or dedicated server if you have command line access.
- Login to the TARGET (new) server where example.com will be hosted and navigate to ~/site_move:
cd ~/site_move - Next give the following commands:
wget https://example.org/site_move/example.org.tar.gz
wget https://example.org/site_move/database_name.sql - You can also download the latest WordPress this way:
wget https://wordpress.org/latest.zip
Example scp command using a hostname: scp example.org.tar.gz [email protected]:site_move/example.org.tar.gz
Example scp command using an ip address: scp database_name.sql [email protected]:site_move/database_name.sql
Both of these commands assume:
→ you are on the SOURCE (existing) server and in the “site_move” directory we created earlier
→ that the same directory exists on the TARGET (new) server
→ That your username on the TARGET (new) server is “username”
Let’s say you’ve moved the backup you created in Step 1 to a location accessible by you online at:
https://example.org/site_move/example.org.tar.gz
https://example.org/site_move/database_name.sql
If the directory does not exist, create it and move into it with this command: mkdir site_move; cd site_move
Step 3 ⊶ Reconnecting the files and database
Description
Here we’ll import and reconnect the database dump, move the old DocumentRoot (core WordPress files, uploads, themes and plugins) into the new DocumentRoot and edit the wp-config.php
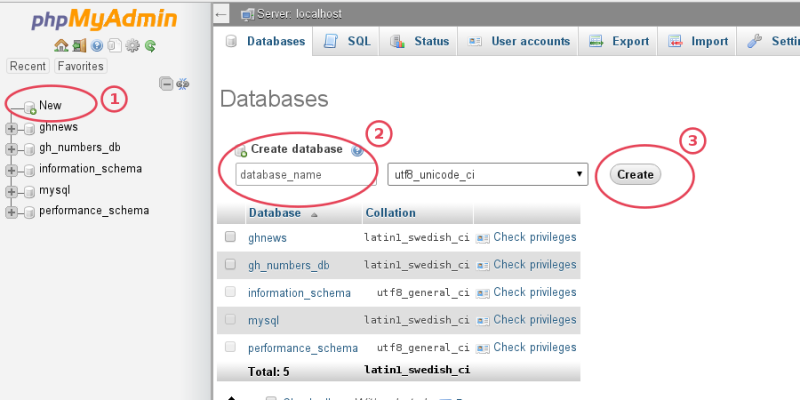
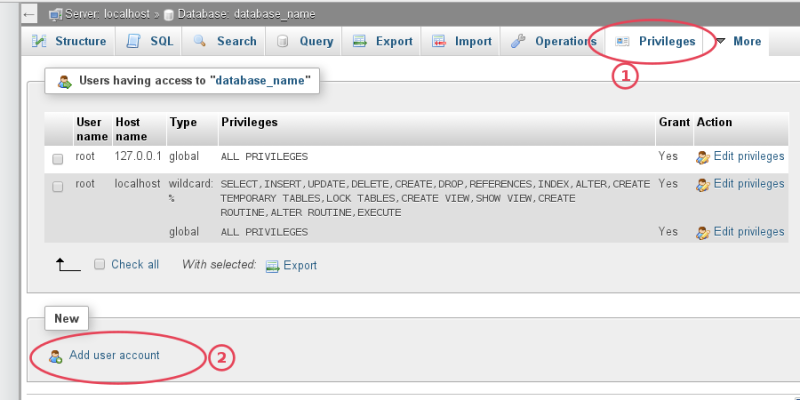
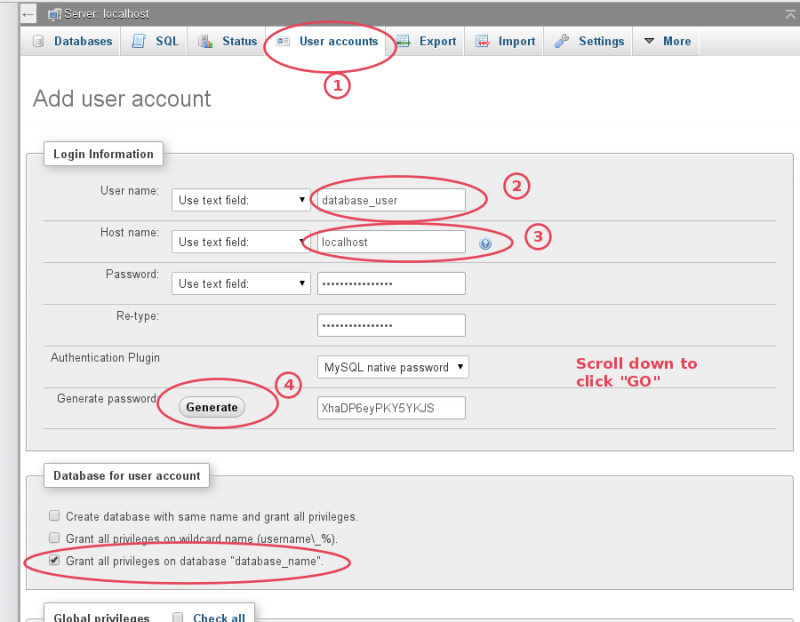
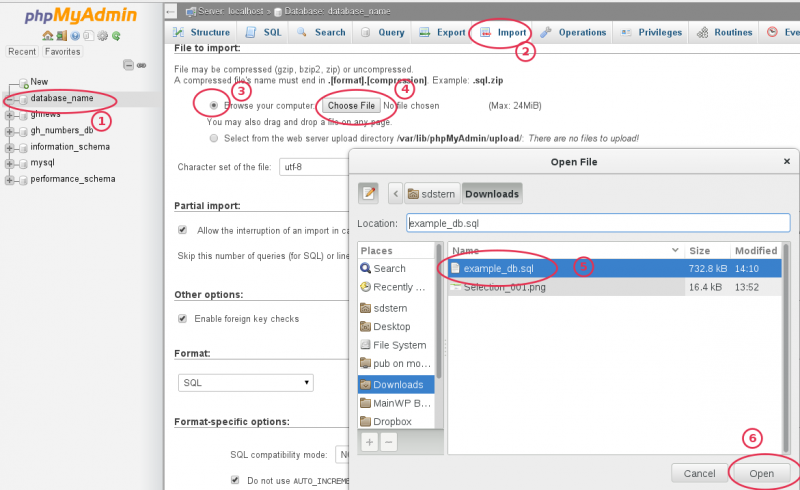
- Create a new database container and admin user for it in MariaDB or MySQL and import database dump into the new container.
mysql -pcreate database database_name;grant all privileges on database_name.* to 'database_admin'@'localhost' identified by 'strong_password';exit;mysql -u username -ppassword database_name < database_name.sql- Move DocumentRoot to the new location | This could require webserver setup and/or configuration
- Get free SSL certificates at StartSSL or the Let's Encrypt project, sponsored in part by Automattic and other companies.
- To avoid MITM (man-in-the-middle) attacks where a user hijacks the communication during the process, which is possible for a split second during a redirect see this article about HSTS (HTTP Strict Transport Security).
- To test your setup with the above configuration and SSLCipherSuite, go to https://www.ssllabs.com/ssltest/
- Read more about Apache httpd Redirect and RedirectMatch
- Edit wp-config.php | we'll need to change the database name, database user, database host, secret key salt table and add some WordPress PHP constants
- Generate new secret key salts and/or replace your old salts. Use the WordPress secret key salt generator.
- If you've used absolute URLs (even if you've used relative URLs chances are high there's still some absolute URLs in your database that are serialized), use one of the following to search/replace the old/new domain names in your database. Do not edit the database dump manually with a text editor or using sed, the URLs are stored in serialized arrays and will be corrupted.
- Webserver Error 500 (Generic)
- Webserver Error 403 (Forbidden)
- Reset file and directory permissions for the DocumentRoot
- Create an explicit entry in your VirtualHost allowing access
- Check your PHP handler and make sure it's setup correctly.
- Webserver Error 404 (Not Found)
- Redirect loops
- Can't Establish Database Connection
- PHP code rendering as plain text directly in the browser
- Absolute URL | https://example.com/page/download.zip
- Relative URL | /page/download.zip
- Protocol-relative or agnostic URL | //example.com/path/to/resource
- You're using Apache httpd as a webserver, not nginx or something else that isn't aware of or doesn't support .htaccess files
- You have no access to your main webserver virtualhost config
- .htaccess files are enabled per the AllowOverride directive in the main webserver config
- FallbackResource is not set/used in your webserver virtualhost config
- mod_rewrite is enabledin the main webserver config
- Everyone understands what .htaccess is, how it's used, enabled and controlled
- PHP-FPM (PHP Fast Process Manager)
- suEXEC
- FastCGI
- mod_php DSO (Dynamic Shared Object)
- suPHP
- mod_ruid2
Note: MariaDB is a fork of MySQL led by the original developers of MySQL. MariaDB is a drop in replacement for MySQL and uses the same command syntax most of the time, there are some differences as well as configuration files, but overall is a more stable choice as MySQL is now owned by Oracle and its future is uncertain with the FOSS community. MariaDB is intended to remain free under the GNU GPL.
Before we begin
You’ll need access to PHPMyAdmin or the command line of your Linux server and a database administrator account.
Don’t forget to read about serialized PHP arrays
To import the database dump from the command line on the TARGET (new) server, follow these steps:
Important security consideration: WordPress requires SELECT, INSERT, UPDATE and DELETE privileges to function normally, however some plugins, themes and some major updates may require table alteration or other functionality which would need elevated privileges. In most cases there is no need to limit these privileges but if you do, do so with caution. Attempting these updates without the proper privileges can damage or destroy your install.
There is no space between the p's above in -ppassword, this is intended and is not a typo
See this nginx WordPress recipe for getting your nginx server up and serving your WordPress site. Here's a link to the WordPress Codex article on nginx.
Here's a sample Apache httpd config that assumes you will be using SSL. Note to WPMU users: If your site is SSL enabled you must have a wildcard ssl certificate for *.example.com or you will run into verification problems with sub-sites.
Apache httpd Configuration
1 2 3 4 5 6 7 8 9 10 11 12 13 14 15 16 17 18 19 20 21 22 23 24 25 26 27 28 29 30 31 32 33 34 35 36 37 38 39 40 41 42 43 44 45 46 47 48 49 50 51 52 53 54 55 56 57 58 59 60 61 62 63 64 65 66 67 68 69 70 71 72 73 74 75 76 77 78 79 80 81 82 83 84 85 86 87 88 89 90 91 92 93 94 95 96 97 98 99 100 101 102 103 104 105 106 107 108 109 110 111 112 113 114 115 116 117 118 119 120 121 122 123 124 125 126 127 128 129 130 131 132 133 134 135 136 137 138 139 140 141 142 143 144 145 146 147 148 149 150 151 152 153 154 155 156 157 158 159 160 161 | ########################## ### Apache httpd vhost ### ########################## <VirtualHost *:80> ## General setup for the default virtual host ## ServerAdmin root@localhost ServerName example.com ServerAlias www.example.com ## Log Files (not necessary, added for redundancy) ## ErrorLog logs/example.com-error_log CustomLog logs/example.com-access_log combined ## Permanent redirect to SSL, uncomment and use *one* of the following ## # Redirect permanent / https://example.com/ # RedirectMatch ^/(.*) https://example.org/$1 </VirtualHost> ############################## ### Apache httpd SSL vhost ### ############################## <VirtualHost *:443> ## General setup for the default SSL virtual host ## ServerAdmin root@localhost DocumentRoot /var/www/example.com ServerName example.com ServerAlias www.example.com <directory /var/www/example.com/> DirectoryIndex index.php FallbackResource /index.php </Directory> <directory /var/www/example.com/wp-admin/> FallbackResource disabled </Directory> ## Enable HSTS (if you have problems with this setting, remove `includeSubdomains;` below ## Header always set Strict-Transport-Security "max-age=63072000; includeSubdomains; preload" ## Log Files ## ErrorLog logs/example.com_ssl_error_log TransferLog logs/example.com_ssl_transfer_log CustomLog logs/example.com_ssl_access_log LogLevel warn ## Enable/Disable SSL ## SSLEngine On ## SSL Protocol support ## SSLProtocol all -SSLv2 -SSLv3 ## SSL Cipher Suite ## SSLHonorCipherOrder On SSLCipherSuite TLS_ECDHE_RSA_WITH_AES_128_CBC_SHA:TLS_ECDHE_RSA_WITH_AES_256_CBC_SHA:TLS_ECDHE_RSA_WITH_3DES_EDE_CBC_SHA:EECDH+ECDSA+AESGCM:EECDH+aRSA+AESGCM:EECDH+ECDSA+SHA384:EECDH+ECDSA+SHA256:EECDH+aRSA+SHA384:EECDH+aRSA+SHA256:EECDH+aRSA+RC4:EECDH:EDH+aRSA:EECDH+AESGCM:EDH+AESGCM:AES256+EECDH:AES256+EDH:ECDHE-RSA-AES256-GCM-SHA384:ECDHE-RSA-AES128-GCM-SHA256:ECDHE-ECDSA-AES256-GCM-SHA384:ECDHE-ECDSA-AES128-GCM-SHA256:ECDHE-ECDSA-AES256-SHA384:ECDHE-ECDSA-AES256-SHA:ECDHE-ECDSA-AES128-SHA256:ECDHE-ECDSA-AES128-SHA:kEDH+AESGCM:DHE-RSA-AES256-GCM-SHA384:DHE-RSA-AES128-GCM-SHA256:DHE-DSS-AES128-GCM-SHA256:ECDHE-RSA-AES256-SHA384:ECDHE-RSA-AES128-SHA256:ECDHE-RSA-AES256-SHA:ECDHE-RSA-AES128-SHA:DHE-RSA-AES256-SHA256:DHE-RSA-AES128-SHA256:DHE-RSA-AES256-SHA:DHE-RSA-AES128-SHA:DHE-DSS-AES128-SHA256:DHE-DSS-AES256-SHA:ECDHE-RSA-DES-CBC3-SHA:EDH-RSA-DES-CBC3-SHA:AES256-GCM-SHA384:AES128-GCM-SHA256:AES256-SHA256:AES128-SHA256:AES256-SHA:AES128-SHA:AES256:AES128:AES:DES-CBC3-SHA:HIGH:!aNULL:!eNULL:!EXPORT:!DES:!MD5:!PSK:!RC4 ## Server Certificate ## SSLCertificateFile /etc/pki/tls/certs/example.com.ssl.crt ## Server Private Key ## SSLCertificateKeyFile /etc/pki/tls/private/example.com.nopass.key ## Certificate Authority (CA) ## SSLCACertificateFile /etc/pki/tls/certs/start-ssl-ca-sha2.pem ## Server Certificate Chain ## SSLCertificateChainFile /etc/pki/tls/certs/sub.class1.server.ca.pem <Directory /var/www/example.com/> <Files ~ "\.(cgi|shtml|phtml|php3?)$"> SSLOptions +StdEnvVars </Files> </Directory> <Directory "/var/www/example.com/cgi-bin"> SSLOptions +StdEnvVars </Directory> ## Compress HTML, CSS, JavaScript, Text, XML and fonts with mod_deflate ## AddOutputFilterByType DEFLATE application/javascript AddOutputFilterByType DEFLATE application/rss+xml AddOutputFilterByType DEFLATE application/vnd.ms-fontobject AddOutputFilterByType DEFLATE application/x-font AddOutputFilterByType DEFLATE application/x-font-opentype AddOutputFilterByType DEFLATE application/x-font-otf AddOutputFilterByType DEFLATE application/x-font-truetype AddOutputFilterByType DEFLATE application/x-font-ttf AddOutputFilterByType DEFLATE application/x-javascript AddOutputFilterByType DEFLATE application/xhtml+xml AddOutputFilterByType DEFLATE application/xml AddOutputFilterByType DEFLATE font/opentype AddOutputFilterByType DEFLATE font/otf AddOutputFilterByType DEFLATE font/ttf AddOutputFilterByType DEFLATE image/svg+xml AddOutputFilterByType DEFLATE image/x-icon AddOutputFilterByType DEFLATE text/css AddOutputFilterByType DEFLATE text/html AddOutputFilterByType DEFLATE text/javascript AddOutputFilterByType DEFLATE text/plain AddOutputFilterByType DEFLATE text/xml ## Remove browser bugs from really old browsers ## BrowserMatch ^Mozilla/4 gzip-only-text/html BrowserMatch ^Mozilla/4\.0[678] no-gzip BrowserMatch \bMSIE !no-gzip !gzip-only-text/html Header append Vary User-Agent ## Expires Caching ## ExpiresActive On ExpiresByType image/jpg "access plus 1 year" ExpiresByType image/jpeg "access plus 1 year" ExpiresByType image/gif "access plus 1 year" ExpiresByType image/png "access plus 1 year" ExpiresByType text/css "access plus 1 month" ExpiresByType application/pdf "access plus 1 month" ExpiresByType text/x-javascript "access plus 1 month" ExpiresByType application/javascript "access 1 month" ExpiresByType application/x-shockwave-flash "access plus 1 month" ExpiresByType image/x-icon "access plus 1 year" ExpiresDefault "access plus 9 days" ## Remove Browswer Entity Tags ## <FilesMatch "\.(ico|pdf|flv|jpg|jpeg|png|gif|js|css|swf)(\.gz)?$"> Header set Expires "Thu, 30 Dec 2021 21:00:00 GMT" Header unset ETag FileETag None </FilesMatch> ######################### ## Additional Security ## ######################### ## Apache httpd 2.2 ## ## Disable access to xmlrpc.php ## <Directory /var/www/example.com/> <Files xmlrpc.php> Order allow,deny Deny from all </Files> ## Disable access to wp-config.php ## <Files wp-config.php> Order allow,deny Deny from all </Files> ## Prevent .htaccess files from being spidered or viewed via a web browser ## <FilesMatch "^\.ht"> Order allow,deny Deny from all satisfy all </FilesMatch> </Directory> ## Apache httpd 2.4 ## ## Disable access to xmlrpc.php ## <Directory /var/www/example.com/> <Files xmlrpc.php> Require all denied </Files> ## Disable access to wp-config.php ## <Files wp-config.php> Require all denied </Files> ## Prevent .htaccess files from being spidered or viewed via a web browser ## <Files ".ht*"> Require all denied </Files> </Directory> ## MSIE fix ## SetEnvIf User-Agent ".*MSIE.*" \ nokeepalive ssl-unclean-shutdown \ downgrade-1.0 force-response-1.0 ## Per-Server Logging ## CustomLog logs/ssl_request_log \ "%t %h %{SSL_PROTOCOL}x %{SSL_CIPHER}x \"%r\" %b" </VirtualHost> |
nginx Configuration (Read More)
openssl dhparam -out /etc/nginx/ssl/dhparam.pem 4096
1 2 3 4 5 6 7 8 9 10 11 12 13 14 15 16 17 18 19 20 21 22 23 24 25 26 27 28 29 30 31 32 33 34 35 36 37 38 39 40 41 42 43 44 45 46 47 48 49 50 51 52 53 54 55 56 57 58 59 60 61 62 63 64 65 66 67 68 69 70 71 | ####################### ### nginx SSL vhost ### ####################### ## General setup for the default SSL virtual host ## server { listen 443; server_name .example.com; root /www/example.com/public; client_max_body_size 512M; ## SSL Configuration ## ssl on; ssl_certificate /etc/pki/tls/certs/example.com.ssl.crt; ssl_certificate_key /etc/pki/tls/private/example.com.nopass.key; ssl_protocols TLSv1 TLSv1.1 TLSv1.2; ssl_prefer_server_ciphers on; ssl_ciphers TLS_ECDHE_RSA_WITH_AES_128_CBC_SHA:TLS_ECDHE_RSA_WITH_AES_256_CBC_SHA:TLS_ECDHE_RSA_WITH_3DES_EDE_CBC_SHA:EECDH+ECDSA+AESGCM:EECDH+aRSA+AESGCM:EECDH+ECDSA+SHA384:EECDH+ECDSA+SHA256:EECDH+aRSA+SHA384:EECDH+aRSA+SHA256:EECDH+aRSA+RC4:EECDH:EDH+aRSA:EECDH+AESGCM:EDH+AESGCM:AES256+EECDH:AES256+EDH:ECDHE-RSA-AES256-GCM-SHA384:ECDHE-RSA-AES128-GCM-SHA256:ECDHE-ECDSA-AES256-GCM-SHA384:ECDHE-ECDSA-AES128-GCM-SHA256:ECDHE-ECDSA-AES256-SHA384:ECDHE-ECDSA-AES256-SHA:ECDHE-ECDSA-AES128-SHA256:ECDHE-ECDSA-AES128-SHA:kEDH+AESGCM:DHE-RSA-AES256-GCM-SHA384:DHE-RSA-AES128-GCM-SHA256:DHE-DSS-AES128-GCM-SHA256:ECDHE-RSA-AES256-SHA384:ECDHE-RSA-AES128-SHA256:ECDHE-RSA-AES256-SHA:ECDHE-RSA-AES128-SHA:DHE-RSA-AES256-SHA256:DHE-RSA-AES128-SHA256:DHE-RSA-AES256-SHA:DHE-RSA-AES128-SHA:DHE-DSS-AES128-SHA256:DHE-DSS-AES256-SHA:ECDHE-RSA-DES-CBC3-SHA:EDH-RSA-DES-CBC3-SHA:AES256-GCM-SHA384:AES128-GCM-SHA256:AES256-SHA256:AES128-SHA256:AES256-SHA:AES128-SHA:AES256:AES128:AES:DES-CBC3-SHA:HIGH:!aNULL:!eNULL:!EXPORT:!DES:!MD5:!PSK:!RC4 ssl_session_cache shared:SSL:10m; ssl_session_timeout 10m; ssl_stapling on; ssl_stapling_verify on; ssl_dhparam ssl/dhparam.pem; ## Turn off promiscuous data ### add_header Strict-Transport-Security "max-age=31536000; includeSubdomains"; add_header X-Frame-Options DENY; add_header X-Content-Type-Options nosniff; ## Logs ## access_log /www/example.com/logs/example.com-access.log main; error_log /www/example.com/logs/example.com-error.log; ## Default location settings ## location / { index index.html index.htm index.php; try_files $uri $uri/ /index.php?$args; } ## Redirect server error pages to the static page /50x.html ## error_page 500 502 503 504 /50x.html; location = /50x.html { root /usr/share/nginx/html; } error_page 404 /404.html; ## Pass the PHP scripts to FastCGI server (locally with unix: param to avoid network overhead) ## location ~ \.php$ { ## Prevent Zero-day exploit ## try_files $uri =404; ## NOTE: You should have "cgi.fix_pathinfo = 0;" in php.ini ## fastcgi_split_path_info ^(.+\.php)(/.+)$; fastcgi_pass unix:/var/run/php-fpm/www.sock; fastcgi_index index.php; fastcgi_param SCRIPT_FILENAME $document_root$fastcgi_script_name; include fastcgi_params; } ## Deny access to .htaccess files, if Apache's document root ## location ~ /\.ht { deny all; } ## Exclude favicon from the logs to avoid bloating when it's not available ## location /favicon.ico { log_not_found off; access_log off; } } |
More helpful resources
1 2 3 4 5 6 7 8 9 10 11 12 13 14 15 16 17 18 19 20 21 | /** The name of the database for WordPress */ define('DB_NAME', 'database_name'); /** MySQL database username */ define('DB_USER', 'database_user'); /** MySQL database password */ define('DB_PASSWORD', 'strong_password'); /** MySQL hostname */ define('DB_HOST', 'mysqlserver.example.net'); Add these additional constants just above: /* That's all, stop editing! Happy blogging. */ /** Additional WordPress PHP Constants **/ define('WP_HOME','https://example.com'); define('WP_SITEURL','https://example.com'); If the site SSL enabled: define('FORCE_SSL_LOGIN', true); define('FORCE_SSL_ADMIN', true); |
Additionally See: this useful guide and full explanation of the wp-config.php file & WordPress PHP Constants
Serialized Arrays
1 2 3 4 5 | $data = array( 'apple', 'banana', 'orange' ); echo serialize( $data ); //Result is a string we can unserialize into an array: a:3:{i:0;s:5:"apple";i:1;s:6:"banana";i:2;s:6:"orange";} |
Let's examine what's going on:
Normal PHP array: array( 'apple', 'banana', 'orange' );
Serialized PHP array: a:3:{i:0;s:5:"apple";i:1;s:6:"banana";i:2;s:6:"orange";}
Use *one* of these to change serialized URL/domain (or other) values in your WordPress database
→ interconnectit's SearchReplaceDB tool
→ wp-cli's Search-Replace command
→ Better Search Replace WordPress Plugin
| Component | Meaning |
|---|---|
| a | array |
| : | separator |
| 3 | 3 elements in array |
| { | open array |
| i | integer |
| 0 | integer value = 0 |
| ; | break |
| s | string |
| 5 | 5 chars in string |
| } | close array |
Troubleshooting
Description
If everything has been done correctly, your new site should be up and running and you should be able to login successfully via http://example.com/wp-login.php
Common Potential Problems
Problem This is a generic webserver error that essentially means "something is wrong, check the error log for details".
Solution Start by checking your webservers error logs. A common problem is using "php_value" directives in your .htaccess file and which aren't supported by some PHP handlers.
Problem This could be file/directory permissions and/or ownership, it could be a deny statement somewhere in your webserver configuration or the PHP handler could be incorrect.
solutions
find /path/to/documentroot -type f -exec chmod 644 {} \; && find /path/to/documentroot -type d -exec chmod 755 {} \;
Apache httpd 2.2
1 2 3 4 | <Directory /path/to/documentroot/> Order allow,deny Allow from all </Directory> |
Apache httpd 2.4
1 2 3 | <Directory /path/to/documentroot/> Require all granted </Directory> |
Problem If previously using "pretty permalinks", they need to be "refreshed"
Solution In the wp-admin go to: Settings --> Permalinks and click "save" twice. Make sure mod_rewrite is enabled.
Problem Incorrect redirect or rewrite rules in .htaccess or the main webserver configuration.
Solution Rename .htaccess, check the main configuration and comment out any redirect or rewrite rules. Check error logs or rewrite logs for clues.
Problem Receiving an error in the browser Can't Establish Database Connection.
Solution Verify each of these settings or conditions: Incorrect database name, database user, database user password, database host, database server is not running, stalled or disk is full, connection issue with database server (if on another host).
Problem PHP is not installed and/or loaded correctly in the main webserver config.
Solution Install PHP and or set a proper PHP Handler, restart the webserver
Table of Contents
Appendix
Absolute URLs vs. Relative URLs vs. Protocol-relative URLs
Absolute URLs vs. Relative URLs vs. vs. Protocol-relative URLs can be a very big pain for many people since WordPress stores URLs in the database such as: internal linking, media files, host/domain name, etc as absolute URLs. Developing with relative URLs can make moving much easier, but at some point there will be something that is saved as an absolute URL which you will either be unaware of or can do nothing about.
There is no "right" or "wrong" method here in terms of absolute vs. relative URLs. This is purely an argument of opinion and and has no bearing on how search engines grade you or how your site is accessed. The important factors to keep in mind here are: WordPress stores URLs as absolute, and that *your site configuration should only resolve to one location* (http/s and www/non-www).
For each new or existing website, 4 potential sites exist, you should pick only one and setup your webserver configuration to reflect that.
→ http://example.com
→ http://www.example.com
→ https://example.com
→ https://www.example.com
The first step usually is to decide www or no-www, again, whatever you choose here is largely irrelevant. The next step is to decide SSL or non-SSL, your webserver should not serve both secure and insecure versions of your site, if you've gone to the trouble of getting an SSL certificate, to avoid messages about mixed or duplicate content use https only in this scenario and redirect all http traffic → https.
Ideally, we want people to simply type in our root domain name "example.com" and land in the correct place. This can be done directly with DNS and/or within the VirtualHost configuration (Apache httpd)
To avoid MITM (man-in-the-middle) attacks where a user hijacks the communication during the process, which is possible for a split second during a redirect see this article about HSTS (HTTP Strict Transport Security).
Use *one* of these to change serialized URL/domain (or other) values in your WordPress database
→ interconnectit's SearchReplaceDB tool
→ wp-cli's Search-Replace command
→ Better Search Replace WordPress Plugin
.htaccess files
.htaccess files, what are they and why do I need them?
Probably the single most misunderstood facet of webserver configuration, .htaccess files are a feature and a part of Apache httpd controlled by the AllowOverride directive and will not work with other popular webservers such as nginx, they have their own mechanisms. .htaccess files are hidden on Linux systems, all files or directories starting with a . are hidden by default, they can be seen using the -a flag for the Linux ls command ls -a. The following "Purpose" and "Use" are taken directly from Apache #httpd live support on Freenode IRC.
.htaccess Purpose: Don't confuse htaccess with password-protection. The purpose of htaccess is to enable users to configure apache locally for their own directories, when they have no privilege to do so in httpd.conf. Using htaccess slows the server. Also rewriterules and redirects are more complex in htaccess
.htaccess Use: if you have access to httpd.conf, there is no reason to use htaccess. You can get a significant performance boost disabling htaccess altogether with AllowOverride None. Your RewriteRules will be simpler too!
WordPress Assumptions
In an effort to help the majority of unskilled users, WordPress erroneously makes several assumptions which are often false and can lead to puzzling results for people new to Apache httpd and .htaccess files.
File Permissions
File permissions control who can view, edit, create or delete files in a given location. On Linux and Unix-like systems WordPress needs directories set to 755 and files set to 644 at a bare minimum. Ideally, with proper webserver and filesystem configuration: 750 and 640.
File permissions are controlled using the Linux chmod command (Change Mode), it controls the permissions set on a file or directory based on 3 (technically 4) octals or numbers which represent:
From 'man chmod'
"A numeric mode is from one to four octal digits (0-7), derived by adding up the bits with values 4, 2, and 1. Any omitted digits are assumed to be leading zeros. The first digit selects the set user ID (4) and set group ID (2) and sticky (1) attributes."
| 1st Octal | Owner (u) | 2nd Octal | Group (g) | 3rd Octal | Other (o) |
7 → -rwx | 5 → -r-x | 5 → -r-x |
6 → -rw- | 4 → -r-- | 4 → -r-- |
Each octal or number has 8 possible values which can be assigned to it (7,6,5,4,3,2,1,0), each value has one or more of the following permissions:
| 4 → r (read) | 2 → w (write) | 1 → x (execute) | 0 → – (none) |
Full table:
| Octal | Octal Values | Symbolic Notation | Numeric Notation | English Meaning |
|---|---|---|---|---|
| 0 | 0 | ---------- | 0000 | (no permissions) |
| 1 | 1 | ---x--x--x | 0111 | (execute) |
| 2 | 2 | --w--w--w- | 0222 | (write) |
| 3 | 2 + 1 | --wx-wx-wx | 0333 | (write / execute) |
| 4 | 4 | -r--r--r-- | 0444 | (read) |
| 5 | 4 + 1 | -r-xr-xr-x | 0555 | (read / execute) |
| 6 | 4 + 2 | -rw-rw-rw- | 0666 | (read / write) |
| 7 | 4 + 2 + 1 | -rwxrwxrwx | 0777 | (read / write / execute) |
File Ownership
File ownership is controlled using the Linux chown command (Change Owner), it controls the ownership and group set on a file or directory.
A typical WordPress DocumentRoot with files and directories owned by user/group "webdev" and PHP-FPM enabled in the Apache httpd VirtualHost configuration.
1 2 3 4 5 6 7 8 9 10 11 12 13 14 15 16 17 18 19 20 21 22 23 24 25 | ls -lah | grep "^d" && ls -lah | grep "^-" && ls -lah | grep "^l" drwxr-xr-x. 6 webdev webdev 4.0K Oct 21 16:16 . drwxr-xr-x. 4 root root 4.0K Oct 21 13:17 .. drwxr-xr-x. 9 webdev webdev 4.0K Oct 21 13:31 wp-admin drwxr-xr-x. 7 webdev webdev 4.0K Oct 21 18:35 wp-content drwxr-xr-x. 12 webdev webdev 4.0K Oct 21 13:31 wp-includes -rw-r--r--. 1 webdev webdev 234 Oct 21 16:15 .htaccess -rw-r--r--. 1 webdev webdev 418 Oct 21 13:31 index.php -rw-r--r--. 1 webdev webdev 20K Oct 21 13:31 license.txt -rw-r--r--. 1 webdev webdev 7.2K Oct 21 13:31 readme.html -rw-r--r--. 1 webdev webdev 4.9K Oct 21 13:31 wp-activate.php -rw-r--r--. 1 webdev webdev 271 Oct 21 13:31 wp-blog-header.php -rw-r--r--. 1 webdev webdev 4.9K Oct 21 13:31 wp-comments-post.php -rw-r--r--. 1 webdev webdev 3.5K Oct 21 13:33 wp-config.php -rw-r--r--. 1 webdev webdev 2.7K Oct 21 13:31 wp-config-sample.php -rw-r--r--. 1 webdev webdev 3.3K Oct 21 13:31 wp-cron.php -rw-r--r--. 1 webdev webdev 2.4K Oct 21 13:31 wp-links-opml.php -rw-r--r--. 1 webdev webdev 3.1K Oct 21 13:31 wp-load.php -rw-r--r--. 1 webdev webdev 34K Oct 21 13:31 wp-login.php -rw-r--r--. 1 webdev webdev 8.1K Oct 21 13:31 wp-mail.php -rw-r--r--. 1 webdev webdev 11K Oct 21 13:31 wp-settings.php -rw-r--r--. 1 webdev webdev 25K Oct 21 13:31 wp-signup.php -rw-r--r--. 1 webdev webdev 4.0K Oct 21 13:31 wp-trackback.php -rw-r--r--. 1 webdev webdev 3.0K Oct 21 13:31 xmlrpc.php |
PHP Handlers
One of the biggest misunderstandings about WordPress is that it requires write access for updates, installing themes or plugins and uploads. Write access is not only determined by file/directory permissions but also file/directory ownership. It matters what user/group owns the WordPress DocumentRoot and how the PHP is being processed and interpreted by the webserver if writes are to be successful. This is where the PHP Handler comes in.
Currently the standard is either PHP-FPM (PHP Fast Process Manager), mod_php DSO (Dynamic Shared Object) or FastCGI. Others such as suPHP or mod_ruid2 are depreciated and no longer developed.
While these will still technically continue to work for the near future, neither have been updated in over 2 years and are not currently actively developed. This certainly presents unnecessary security risks as the underlying webservers and systems are in constant development. If you're currently using either of these they should be phased out and no longer used in favor of one of the options below.
Currently supported and/or actively developed
FPM (FastCGI Process Manager) is an alternative PHP FastCGI implementation with some additional features (mostly) useful for heavy-loaded sites.
The suEXEC feature provides users of the Apache httpd server the ability to run CGI and SSI programs under user IDs different from the user ID of the calling webserver. Normally, when a CGI or SSI program executes, it runs as the same user who is running the webserver.
FastCGI offers the security benefits of suPHP by executing files as the owner of the file. Unlike suPHP however, it keeps an open session for the file when the processing is done resulting in significant memory use, but also allowing for the use of OPCode caching such as APC or memcached. If you do have the memory for it however FastCGI is arguably the fastest handler even in comparison with mod_php.
DSO (Dynamic Shared Object) or mod_php is the oldest and, some would say, the fastest PHP handler available. It essentially makes PHP a part of Apache httpd by having the Apache httpd server interpret the PHP code itself through use of a module known as mod_php. This is the default handler typically installed when installing a webserver package on your server.
Depreciated or discontinued / abandoned
suPHP (Single user PHP) also runs PHP as a CGI module instead of an Apache httpd module. It differs from CGI in that PHP scripts that are called from the web browser will run on the server under the user that owns them, as opposed to ‘nobody’ or ‘apache’.
mod_ruid2 is an suEXEC module for Apache httpd which takes advantage of POSIX.1e capabilities to increase performance.
Additional Help & Resources
If you have more questions or need additional help, try connecting to #wordpress live support on Freenode IRC or follow these steps to join the official WordPress Slack live support.
Manage multiple (10's or 100's) of WordPress installs from a single location using one of these applications


